How to Bleed Your Brakes: A Master Tech's Guide to Every Method (2026)
How to bleed your brakes, from an ASE Master Tech: six methods compared, the right corner order, ABS bleed routines, bleeder torque, and brake fluid rules.
Updated
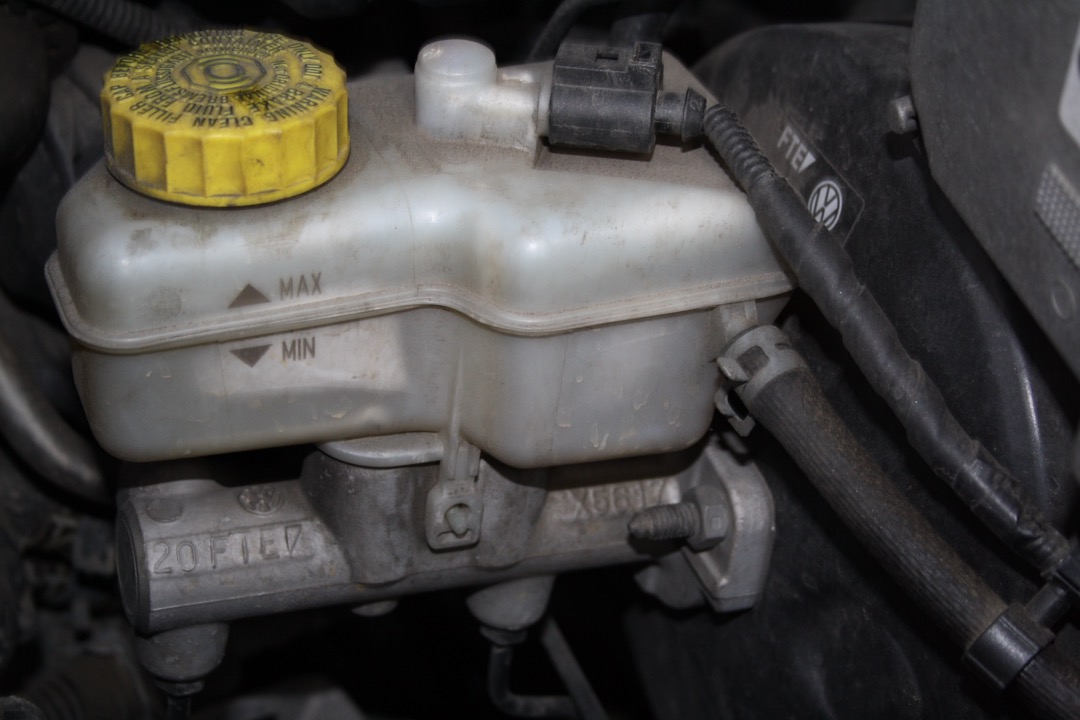
Nine times out of ten, when a customer tells me their brakes feel wrong, they mean the pedal. It sits lower than it used to, it feels like stepping on a sponge, or it creeps toward the floor at a red light. The pads and rotors are fine. The problem is the fluid: air that got into the lines, or fluid that has soaked up enough water over the years to stop behaving like a solid column. Learning how to bleed your brakes fixes both.
Bleeding means pushing fluid through until the air comes out, which you do after opening a line or when the pedal goes soft. A flush means running enough fresh fluid through every corner to replace all of the old fluid, on a maintenance timer. The technique is identical. What changes is how much fluid you push and why.
Below are the six methods, the corner order, what changes with ABS, and how to tell you are finished. If you swapped a caliper during a brake pad change, this is your next step.
Brake Bleeding at a Glance
Time required: About an hour for a routine flush with good access and bleeders that turn freely. Double it the first time, and plan on longer if a bleeder is seized.
Difficulty: Easy to moderate. The work is simple. The penalty for getting it wrong is a pedal that goes to the floor.
Tools: A six-point wrench for the bleeders, clear vinyl hose, a catch bottle, a turkey baster, a jack and jack stands, a low-range torque wrench, and fresh sealed fluid of the correct DOT spec.
When it is due: After any repair that opens the system, whenever the pedal feels soft, and on your manufacturer’s fluid interval, commonly every two to three years.
When NOT to DIY: If the master cylinder or ABS unit ran dry or was replaced and you have no bidirectional scan tool, if a bleeder is already rounded, if fluid is leaking, or if the pedal sinks slowly under steady pressure. That last one is usually a failing master cylinder, and bleeding will not fix it.
When Your Brakes Need Bleeding
The pedal is soft, spongy or low. Air compresses and brake fluid does not, so even a small bubble turns part of your pedal stroke into squeezing air. If the pedal was fine yesterday and soft today with no work done, look for a leak first. Air does not get into a sealed system on its own.
The fluid is due. Brake fluid absorbs moisture through hoses and seals, and water lowers its boiling point and corrodes the metal inside the system. You feel it first on a long downhill grade, where fluid near the calipers boils and the pedal fades.
You opened the hydraulic system. Replacing a caliper, hose, hard line or wheel cylinder lets air in at that point. Usually only that corner needs bleeding, provided the reservoir never dropped low and the open line was plugged quickly.
The reservoir ran low or dry. Once the level falls below the ports in the base of the reservoir, the master cylinder pulls air in and pumps it downstream. Now the whole system needs bleeding, and on an ABS car possibly the control unit too.
Tools and Supplies
The bleeder wrench matters most. Bleeders are small, commonly 8mm, 10mm or 11mm, and soft enough to round off. Use a six-point box-end wrench or a shallow six-point socket, never an open-end. A good socket set covers the sockets, and a mechanic tool set with combination wrenches gives you box ends that fit over the bleed hose.
You also need clear vinyl hose that fits snugly over the bleeder nipple, and a catch bottle with an inch of fresh fluid in the bottom so the hose end stays submerged. For lifting, a floor jack plus stands under solid points, because most cars need the wheels off and nobody belongs under a car held up by a jack alone. Add a turkey baster, lint-free rags and a spray bottle of water. Our list of essential tools for DIY car maintenance covers anything your garage is missing.
Buy more fluid than you think: a full flush on a typical car often uses about a quart.
Bleeding Order: Start Farthest From the Master Cylinder
Bleed the corner with the longest brake line first and finish at the shortest. On a typical left-hand-drive car in the US, that is right rear, left rear, right front, left front. Starting at the far end clears the longest run first, so you never push air back into a corner you already finished.
Diagonal-Split Systems
Most front-wheel-drive cars split the hydraulics diagonally: one circuit feeds the left front and right rear, the other the right front and left rear, so a single failure still leaves you one front brake. Farthest-first usually works fine here, but some procedures alternate circuits, for example right rear, left front, left rear, right front.
When the Manufacturer Says Otherwise
Some makes publish their own order, and some Honda service procedures start at a front wheel. Certain ABS units call for a sequence tied to how the modulator routes fluid. The service manual wins every time. Without it, farthest-first is the safe default for a routine flush.
Six Ways to Bleed Brakes
Every method does the same job. They differ in who does the pushing.
| Method | Who it suits | Speed | Cost level | Main gotcha |
|---|---|---|---|---|
| Two-person pump-and-hold | Anyone with a patient helper | Moderate | Lowest | Full pedal strokes can damage an old master cylinder |
| One-person check valve | Solo home mechanic | Moderate | Low | You still have to watch the reservoir |
| Vacuum bleeder | Solo, frequent flushes | Fast | Low to moderate | Air drawn past bleeder threads looks like air in the system |
| Pressure bleeder | Frequent use, many European cars | Fastest | Moderate | Too much pressure or the wrong reservoir adapter |
| Gravity | One corner after a caliper swap | Slow | Lowest | May leave air trapped high in a caliper |
| Reverse | Awkward calipers, clutch hydraulics | Moderate | Low | Can push debris toward the ABS unit and master |
Two-Person Pump-and-Hold
The helper pumps the pedal three or four times and holds steady pressure. You open the bleeder about a quarter turn, fluid and air rush out, and the pedal drops. You close the bleeder, and only then does the helper let the pedal up. Repeat until the fluid runs clear. Agree on the calls first: I use “down” when the pedal is held and “up” once the bleeder is shut. Most botched bleeds come from releasing the pedal with the bleeder still open, which pulls air straight back in.
One-Person With a Check-Valve Bottle or Bleeder Hose
A catch bottle or hose with a one-way valve lets fluid out but stops air being drawn back in when the pedal returns. Open the bleeder, pump slowly yourself, then go back and look at the hose. Check-valve bleeder screws do the same job and stay on the car. The valve does nothing for the reservoir, so get out of the seat every few strokes and check the level.
Vacuum Bleeder
A hand pump or compressed-air venturi pulls fluid out through the bleeder, so nobody touches the pedal. The trap: with the bleeder cracked open, vacuum draws air in past the threads, and you get a steady stream of tiny bubbles that never stops. A dab of grease or a wrap of Teflon tape on the threads above the seat seals that path. Keep tape off the tapered tip, which is where the bleeder seals. Finish with a pedal check.
Pressure Bleeder
This pushes fluid into the reservoir through a sealed adapter cap, and you open each bleeder in turn. The correct adapter for your reservoir is essential. Run it at low pressure, commonly around 10 to 15 psi, and never above the limit set by the tool maker or the adapter, because plastic reservoirs crack. Never let the tank run dry, or it pushes air into the system you just cleaned.
Gravity Bleeding
Open the bleeder, keep the reservoir full, and let fluid drip out on its own. It is slow and may not clear a bubble sitting high in a caliper, so follow it with a few gentle pedal-assisted pushes.
Reverse Bleeding
A syringe on the bleeder pushes fresh fluid up toward the reservoir, letting air travel the way it naturally wants to go, while you draw the rising fluid out of the reservoir. It helps on some awkward calipers and on clutch hydraulics. The catch is that it pushes old fluid and debris from the caliper back through the ABS valves and into the master cylinder. That makes it a niche technique, not a routine flush method.
Pump-and-Hold Without Damaging the Master Cylinder
Same warning as in the brake pad guide, and it matters more here because a bleed means dozens of pedal strokes. On a car with years of normal driving, the master cylinder piston only travels through the top of its bore, and the lower section collects corrosion and deposits. Push the pedal to the floor and the seals get dragged across that rough section, where they can tear.
The damage shows up later as a pedal that slowly sinks at a light. Put a short block of wood under the pedal to limit travel, or have your helper stop at about two-thirds of the stroke. The pedal drops hard when the bleeder opens, so the block does real work.
ABS Systems and the Scan Tool Question
A routine flush where the reservoir never drops below MIN and air never reaches the hydraulic control unit usually needs no scan tool. Conventional bleeding moves fresh fluid through the main passages of the ABS unit on the way to the wheels. Some manufacturers do call for the ABS routine on every flush, so check your procedure.
It changes if the reservoir ran dry, the master cylinder or ABS unit was replaced, or air reached the control unit. Air trapped in its internal valve passages survives a conventional bleed, then moves into the lines the first time ABS activates, and the pedal goes soft mid-stop. Most systems need the automated bleed routine, run through a bidirectional scan tool that cycles the ABS valves and runs the pump, followed by a final conventional bleed.
A basic code reader cannot do this, because it only reads and clears codes and cannot command the module. Our guide to the best OBD2 scanners separates tools with genuine bidirectional control from code readers. Confirm coverage for your make before you buy.
Bench-Bleeding a New Master Cylinder
A new master cylinder arrives dry, and purging it through the lines on the car rarely gives a good pedal. Clamp it in a vise by the mounting flange with soft jaws, level. Thread the bench bleed fittings into the outlet ports and run the tubes back into the reservoir below the fluid line. Fill the reservoir and stroke the piston slowly with a wooden dowel or blunt extension. A full stroke is fine on a new unit. Keep going until no bubbles come out of either tube, then plug the ports, install it, connect the lines quickly, and bleed the whole system. A few units are designed to be bled on the vehicle, so read the box.
Brake Fluid: What Goes in the Reservoir
The required spec is printed on the reservoir cap. DOT 3, DOT 4 and DOT 5.1 are glycol-based and compatible with each other, and a higher spec than the cap calls for is fine. DOT 5 is silicone and never goes into a glycol system.
| Fluid | Base | Minimum dry boiling point | Minimum wet boiling point |
|---|---|---|---|
| DOT 3 | Glycol | 401F | 284F |
| DOT 4 | Glycol | 446F | 311F |
| DOT 5.1 | Glycol | 500F | 356F |
| DOT 5 | Silicone | 500F | 356F |
Those are federal minimums, and “wet” means after absorbing about 3.7 percent water. Glycol fluid is hygroscopic, pulling moisture from the air, so an opened bottle on a shelf for a year is already partway to wet. Use a fresh, sealed bottle every job, and never pour catch-bottle fluid back in.
Glycol fluid also strips paint. Lay a fender cover down, and if fluid lands on paint, rinse it with plenty of water right away and blot dry with clean microfiber towels.
How Often to Flush Brake Fluid
Many manufacturers specify a fluid change every two to three years. Some set a mileage interval, and some leave it to inspection. Your owner’s manual is the authority, and our car maintenance schedule shows where brake fluid fits with everything else. If you tow or drive in the mountains, lean toward the short end. On many manual-transmission cars the clutch shares the brake reservoir, so bleed the clutch slave during the flush or the oldest fluid in the car stays in the clutch hydraulics.
Bleeder Screw Torque
Bleeders take very little torque, typically in the region of 5 to 11 ft-lb depending on thread size, with many around 7 to 9 ft-lb (84 to 108 in-lb). Confirm the figure in your service data. The screw seals on its tapered tip, not on thread tension, so extra force adds nothing.
They are hollow steel screws with a cross-drilled passage, so the neck is the weakest point on the caliper. Overtighten one in an aluminum caliper and it snaps or pulls the threads. An inch-pound torque wrench is the right tool. Failing that, a short wrench and real restraint: snug, then stop. Refit the rubber dust caps, since a bleeder packed with grit is the one that seizes next time.
Stuck or Rounded Bleeder Screws
Soak a seized bleeder with penetrating oil and give it time, overnight if you can. Use a snug six-point box-end wrench or six-point socket, never a twelve-point or open-end. A few sharp taps on the end of the wrench break the threads loose better than a steady pull. Heat is a last resort: brake fluid is flammable and the piston seals and boots are rubber, so keep heat small, on the caliper body around the screw, and away from fluid and seals. If the bleeder snaps, the caliper usually gets replaced.
How You Know You Are Done
A corner is finished when the fluid in the hose runs clear, bubble-free and the same color as the new bottle. The system is finished when the pedal is firm and high: start the engine and press with steady, moderate pressure for 30 seconds, and it should stay put. Top the reservoir to MAX, refit the cap, check every bleeder for weeping, refit the wheels, and torque the lug nuts. Road test at low speed in an empty lot, gentle stops first, then firmer ones, before you go near traffic.
Common Mistakes
- Letting the reservoir run dry, which turns a flush into an air hunt and sometimes a scan tool job.
- Using the wrong fluid, above all DOT 5 silicone in a glycol system.
- Pouring fluid from the catch bottle back into the reservoir.
- Overtightening bleeders and snapping them in an aluminum caliper.
- Forgetting to top up between corners and again at the end.
- Leaving the reservoir cap off while the fluid pulls moisture from the air.
- Working under a car held up by a jack instead of stands.
- Not torquing the lug nuts after the wheels go back on.
- Pushing the pedal to the floor on an older master cylinder.
Final Thoughts from the Shop
Bleeding brakes rewards patience far more than strength. Nearly every DIY bleed that comes back to my shop traces to a reservoir that ran low or a corner that got rushed. Go corner by corner, watch the reservoir like it owes you money, and do not call it done until the pedal passes the steady-pressure test.
If the bleed was part of a bigger brake job, pair fresh fluid with fresh friction. Our roundup of the best brake pads covers which compound suits how you drive, and the brake pad guide walks through the rest of the job.
Frequently Asked Questions
Can I bleed brakes by myself?
How do I know if there is still air in the brake lines?
What happens if the master cylinder runs dry?
Can I mix DOT 3 and DOT 4 brake fluid?
Why is my brake pedal still soft after bleeding?
Related Articles
How to Change Brake Pads: A Master Tech's Complete Walkthrough (2026)
maintenance-parts
Car Maintenance Schedule: What to Replace and When (2026 Guide)
maintenance-parts
7 Best Brake Pads of 2026
maintenance-parts
How to Change Your Own Oil: A Step-by-Step Guide from an ASE Master Tech (2026)
maintenance-parts
How to Change Spark Plugs: An ASE Master Tech's Step-by-Step Guide (2026)
maintenance-parts
About the Reviewer
Mike Reeves, ASE Master Technician
A.A.S. Automotive Technology, Universal Technical Institute (UTI)
Mike Reeves is an ASE Master Technician with 15 years of hands-on experience in automotive repair and diagnostics. He earned his A.A.S. in Automotive Technology from UTI and runs his own independent shop in Denver, Colorado. Mike founded RevRated to help everyday car owners make smarter parts decisions -- every recommendation comes from real-world testing in his garage.