How to Change Your Own Oil: A Step-by-Step Guide from an ASE Master Tech (2026)
An ASE Master Tech's complete DIY oil change walkthrough — tools, supplies, drain plug torque specs, filter installation, disposal, and the mistakes that cost engines.
Updated
The first oil change I ever did, I did wrong in three different ways and got lucky on all three. I forgot to put the new gasket on the drain plug — luckily the old one was still in good shape and I caught the missing crush washer when I went to torque it down. I overtightened the drain plug because I did not own a torque wrench yet — luckily the oil pan threads survived. And I forgot to pull the old filter gasket off the engine block before installing the new filter, which meant the new filter was sealing against two stacked rubber gaskets — luckily I caught the slow leak in the driveway five minutes after the engine started, before any meaningful oil pressure had been lost. Three mistakes, three near-misses, and an inexpensive education that has informed every oil change I have done in the twenty-plus years since.
I am Mike Reeves, an ASE Master Technician, and the reason I am telling you about my own beginner mistakes upfront is that the SERP for DIY oil change guides is full of articles that pretend the job is simpler than it is. It is not hard, and you can absolutely do it yourself — but the difference between the version that goes well and the version that costs you an oil pan or an engine is paying attention to the specific things that go wrong for first-timers. This guide is the version I would write for my brother-in-law. Ten numbered steps, the warm-not-hot drain rule, the drain plug torque spec, the double-gasket failure mode, the disposal options, and the honest list of when to take it to a shop instead.
Read it once before you start. The work itself is 30 to 45 minutes. The savings are real — about 50 to 70 dollars per change on a synthetic oil service compared to a quick-lube shop, or 80 to 120 dollars compared to a dealer. Across a vehicle’s life, that is thousands of dollars. The bigger value, in my experience, is the connection to your own car. Owners who change their own oil notice problems earlier, drive more thoughtfully, and develop the kind of mechanical literacy that pays off across every other aspect of vehicle ownership. The first one teaches you the most. The fiftieth one is meditative.
DIY Oil Change at a Glance
The whole job in one scannable summary. Detail by section follows.
| Item | Specification |
|---|---|
| Time | 45 minutes (first time) — 25 minutes (with experience) |
| Difficulty | Beginner (with one prerequisite: safe vehicle lifting) |
| Cost (DIY) | $35 to $55 in materials (synthetic) |
| Cost (Shop) | $70 to $120 (quick-lube) — $90 to $160 (dealer) |
| Savings per Change | $40 to $70 |
| Tools Required | Floor jack + jack stands or ramps, drain pan, sockets, filter wrench, torque wrench, funnel, gloves, shop towels |
| Supplies Required | New oil (correct viscosity and quantity), new oil filter, new crush washer (most vehicles) |
| Frequency | Per owner’s manual: 5,000 mi (conventional) to 10,000 mi (full synthetic), or once a year minimum |
What You’ll Need
Before you start, gather everything. Running back to the parts store mid-job with oil draining onto your driveway is the most common first-timer frustration.
Tools:
- Floor jack rated for your vehicle weight, plus two jack stands — or a pair of vehicle ramps. Our best floor jacks and best jack stands guides cover the rated equipment that handles this safely.
- Wheel chocks (or any wedge-shaped object — bricks work)
- Oil drain pan with at least 8-quart capacity (most cars hold 5 to 7 quarts)
- The correct socket for your drain plug — usually 13mm, 14mm, 15mm, 17mm, or 19mm depending on the vehicle. Check your manual or the plug itself.
- Ratchet handle or breaker bar to fit the socket
- Oil filter wrench sized for your specific filter (or a cap-style wrench for cartridge filter housings) — our best socket sets guide covers complete kits that include the common drain plug sockets, and our best torque wrenches guide covers the click-style wrench that matters most for the final drain plug torque.
- Torque wrench in the 20 to 50 lb-ft range (this is non-negotiable for the drain plug — more on that below)
- Funnel
- Magnetic LED work light or trouble light
- Nitrile or latex gloves
- Shop towels or a roll of paper towels
Supplies:
- New motor oil — exactly the viscosity and quantity specified in your owner’s manual. Most modern engines call for 5 to 7 quarts of full synthetic. Buy a 5-quart jug and a separate 1-quart bottle so you can dispense the final amount precisely.
- New oil filter — the correct part number for your engine. Cross-reference at any parts store using your year, make, model, and engine size. Our best oil filters guide ranks the synthetic-media filters by engine type and brand reputation.
- New crush washer (gasket) for the drain plug — most vehicles use one and it is meant to be replaced every oil change. About 50 cents at the parts store. Some vehicles use a reusable rubber-coated washer that is checked but not always replaced — the manual specifies.
If your vehicle has a cartridge-style oil filter, you may also need new O-rings for the housing cap. They typically come included with the cartridge filter element.
Before You Start: Warm, Not Hot
The most consequential safety detail of the entire job, and the one almost no other DIY guide gets right.
You want the oil warm so it flows freely and carries suspended contaminants out of the pan, but not so hot that a splash burns you. The right range is roughly 130 to 150 degrees Fahrenheit — a temperature you can comfortably hold a hand against the oil pan for a few seconds without flinching. Two reliable ways to get there: idle the engine for five to ten minutes, or drive a few blocks and back. Either works.
Two ways to get this wrong. First, draining cold oil from a vehicle that has been sitting overnight — the oil is too viscous to flow freely, the drain takes 20 minutes, and significant residue stays in the pan. Second, draining oil immediately after highway driving — that oil is around 220 degrees Fahrenheit, and a splash on bare skin causes second-degree burns instantly. The professional rule is the hand-on-the-pan test. If you cannot comfortably touch it, let it cool for 20 minutes before continuing.
Park on a level surface, set the parking brake, and turn the engine off completely. Let it sit two to three minutes before continuing — this gives the oil in the upper engine time to drain back down to the pan, which is where you want it for the change.
Step-by-Step Oil Change (10 Steps)
Step 1 — Lift the Vehicle Safely (or Skip If You Have Clearance)
If you can comfortably reach the drain plug and oil filter without lifting — common on full-size trucks and SUVs — skip the lift entirely and slide under on a creeper or piece of cardboard. For everything else, use ramps or a jack-and-stands setup.
Ramps: Place ramps in front of the front tires, drive forward slowly until the front wheels are seated solidly on the ramp tops, set the parking brake, place wheel chocks behind the rear tires, shut off the engine.
Jack-and-stands: Use the factory jack points specified in your owner’s manual — never lift on the oil pan, plastic trim, or random underbody locations. Lift one front corner at a time, place a stand at the rated jack point, lower the vehicle onto the stand. Repeat on the other side. With the front lifted, place wheel chocks behind the rear wheels for redundancy. Verify stability with a firm shake at the front bumper before going under. Never get under a vehicle supported by a floor jack alone. The hydraulic jack is the lifting tool. The stands are the support. There is no substitute.
Step 2 — Locate the Drain Plug and Oil Filter
Slide under and identify both. The drain plug is the lowest point on the oil pan — a hex-head bolt threaded into the bottom or side of the pan. It will have oil residue around it from previous changes. The oil filter is either a cylindrical canister threaded onto the side or front of the engine block (spin-on type) or a cap on the top or side of the engine that covers a cartridge element (cartridge type). On vehicles with skid plates or splash shields, you may need to remove a few clips or screws to access either.
Position the drain pan directly below the drain plug, offset slightly toward the side the plug threads come out — initial drain shoots sideways for the first ten seconds before settling into a vertical stream.
Step 3 — Remove the Drain Plug
Use the correct socket and a ratchet to break the plug loose (counterclockwise). Once it turns freely, switch to spinning it out by hand — wear gloves, the plug will be warm. Hold the plug firmly as the last threads release, because oil will rush out the moment the plug clears the threads. Keep the plug clear of the drain pan so you do not lose it.
Inspect the old crush washer — it should still be on the plug or stuck to the pan. Remove and discard it. Inspect the threads on the plug for damage — if the threads look ragged or stripped, stop and reassess; this is a sign of overtightening on a previous change and the pan may need attention.
Step 4 — Let the Oil Drain Completely
This is the patient step. Most vehicles fully drain in three to five minutes. Resist the temptation to rush. While you wait, this is the time to inspect the oil pan area for leaks (any wet seepage that is not the drain plug?), check for any unusual particles in the draining oil (metallic shavings would mean engine wear; carbon-black flecks are normal), and prep the new filter and supplies.
Some technicians wait until the drain slows to a slow drip — typically eight to ten minutes total — for maximum oil removal. This is correct but optional; the difference is a few ounces of residual old oil in a five-quart system, which is a small fraction of total volume.
Step 5 — Remove the Old Oil Filter
Spin-on filter: Use the filter wrench to break the filter loose (counterclockwise), then spin it off by hand. The filter holds about half a quart of oil — tip it carefully toward the drain pan as you remove it to catch the drain. Critical check: look at the engine block where the filter mounted. The old rubber gasket should have come off with the filter. If a black rubber ring is still stuck to the engine block, the gasket separated. Peel it off completely with a fingernail or plastic scraper before installing the new filter. Installing a new filter against a stuck old gasket creates a double-seal that fails almost immediately and dumps your oil in the driveway within minutes of startup. This is the most common catastrophic mistake in DIY oil changes.
Cartridge filter: Use the cap-style wrench to remove the housing cap. Pull the old cartridge element out and discard it. Inspect the cap and housing O-rings — replace any that come with the new cartridge filter or that show flattening, cracking, or hardness.
Step 6 — Install the New Oil Filter
Spin-on filter: Lubricate the rubber gasket on the new filter with a thin coat of fresh oil — your finger dipped in clean oil, applied around the entire gasket. This step matters more than most beginners realize: a dry gasket can grab and tear during installation, leaving a bad seal. Thread the filter onto the engine by hand until you feel the gasket make initial contact with the block — the filter will spin freely and then resist. From contact, rotate three-quarters of a turn additional by hand. Some filters specify a different turn — check the box or the filter itself for the spec. Do not use a filter wrench for installation. Hand-tight plus three-quarters of a turn is the correct torque for almost every spin-on filter, and using a wrench creates a removal nightmare next time.
Cartridge filter: Drop the new element into the housing in the correct orientation (typically with the open end down toward the housing base). Replace the cap O-rings. Hand-thread the cap until snug, then torque to the spec in the manual — typically 18 to 25 lb-ft.
Step 7 — Install the Drain Plug with Torque to Spec
Place the new crush washer on the drain plug. Thread the plug back into the pan by hand — important, because crossthreading the plug ruins the oil pan and is a 500 to 1,500-dollar repair. Spin it in by hand until it seats snugly against the pan. Then use the torque wrench to bring it to spec.
Drain plug torque specs by engine type (typical ranges):
- Most gasoline passenger cars (Honda, Toyota, Subaru, Mazda, GM, Ford): 20 to 30 lb-ft
- European vehicles (BMW, Mercedes, Audi, VW): 18 to 25 lb-ft (often with a torque-to-yield warning)
- Light trucks (F-150, Silverado, Ram 1500): 25 to 35 lb-ft
- Diesel pickups (Powerstroke, Cummins, Duramax): 30 to 40 lb-ft
Always defer to the spec in your owner’s manual or service manual — the ranges above are typical, not authoritative. The torque wrench is non-negotiable for this fastener. The oil pan is often soft aluminum, the drain plug is steel, and overtightening strips the pan. The cost of a torque wrench is the cost of one stripped oil pan, and the wrench keeps paying for itself permanently.
Hand-tight-plus-an-eighth-turn is the field approximation if a torque wrench is genuinely unavailable, but buy the wrench. There is no good reason to skip this.
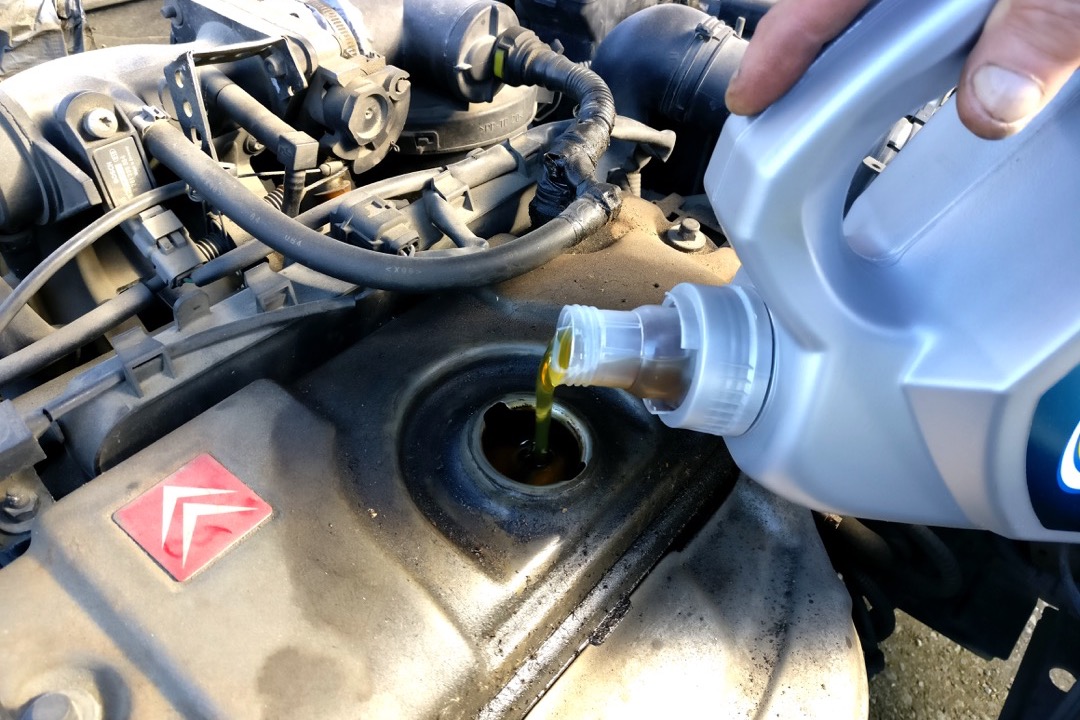
Step 8 — Add the New Oil
Lower the vehicle off ramps or stands (back to ground level — never add oil with the vehicle still lifted, as the dipstick reading will be wrong). Open the oil filler cap on the top of the engine, place the funnel in the filler neck, and pour in the specified quantity from your owner’s manual. Most modern engines take 4.5 to 6 quarts.
Pour slowly enough that the oil flows down the funnel without backing up. If you bought a 5-quart jug and your engine takes 4.7 quarts, pour the full jug minus the last 0.3 quarts you can eyeball, then use a separate quart bottle to add the precise final amount. A small precision pour at the end beats overfilling and having to drain some back out.
Step 9 — Start the Engine, Check for Leaks (60 Seconds)
Replace the oil filler cap. Make sure your tools and rags are clear of the engine bay. Start the engine and let it idle for 60 seconds. Watch the oil pressure light or gauge — it should go out within a few seconds of startup. If the light stays on past five to ten seconds, shut the engine off immediately and check what is wrong (most commonly: missing or damaged filter gasket, drain plug not seated, or wrong oil quantity).
Walk around to the front and look under the vehicle while it idles. Watch the drain plug area and the filter area for any active drips. A small initial drip at the filter that stops within 30 seconds is normal as the new gasket seats. A continuing drip is a sealing failure that needs immediate attention. Shut off the engine.
Step 10 — Check the Dipstick and Reset the Oil Light
Wait two to three minutes after shutdown for the oil to drain back to the pan. Pull the dipstick, wipe it clean with a shop towel, reinsert fully, then pull again to read the level. The oil should read between the minimum and maximum marks, ideally at or near the maximum mark. Add a small amount through the filler if low; pull a small amount out via the dipstick tube with a fluid extractor if high (overfilling can cause foaming and seal damage and is worth fixing rather than ignoring).
Reset the oil-life monitor according to your owner’s manual procedure. Common patterns: pump the gas pedal to the floor three times within 10 seconds with the ignition on; hold the trip-meter reset while turning ignition on; or navigate the dashboard menu to a maintenance reset option. Without the reset, the OLM keeps counting from the last service and will prompt you for the next change thousands of miles too early.
Record the date, mileage, and oil specification (brand, viscosity, quantity used) in a service log — a notebook in the glove box, a phone note, or a maintenance app. Future-you and any future owner will benefit from the record.
How to Dispose of Used Oil (Free, and Easy)
Used oil is hazardous waste. It cannot go in the regular trash, the storm drain, the lawn, or anywhere except a proper collection point. Federal law and most state laws are clear on this, and the environmental impact of improperly dumped oil is significant — one gallon of motor oil can contaminate a million gallons of fresh water.
The good news: disposal is free at most major auto parts stores and many municipal facilities. Locations that accept used motor oil at no charge:
- AutoZone, O’Reilly Auto Parts, Advance Auto Parts, NAPA Auto Parts — all major chains accept up to five gallons per visit free
- Walmart Auto Care Centers — most locations accept used oil at no charge
- Local municipal hazardous waste facilities — typically accept oil along with paint, batteries, and other household hazardous waste
- Earth911 locator at search.earth911.com — finds the nearest options for any zip code
The same locations typically accept used oil filters (drain them for 24 hours first by puncturing the dome and letting them drip into your drain pan). Practical workflow: keep the empty 5-quart jug from the new oil, pour the used oil from your drain pan into it through the funnel after each change, seal the cap, and take it in once full. Five quarts of used oil weighs about 9 pounds — manageable in any vehicle. The disposal step is the part beginners worry about most and is genuinely the easiest part of the whole process.
When NOT to Do Your Own Oil Change
Twenty years of shop work tells me there are situations where the right answer is to pay a shop. None of these are about lacking skill — they are about the math not working out.
Stripped or damaged drain plug threads. If a previous oil change overtightened the drain plug and the pan threads are damaged, the next plug will leak or strip out completely. A thread repair kit (Time-Sert, Heli-Coil) can sometimes fix it, but the proper repair is often an oil pan replacement. This is shop work, not driveway work.
Crossthreaded filter housing. If the spin-on filter mount stub or cartridge housing has been crossthreaded by a previous service, the cure is repair or replacement, not workaround. Trying to thread a new filter onto damaged threads makes it worse.
Vehicles with extensive plastic underbody trays. Some German vehicles and modern hybrids have splash shields with twenty or more clips and screws that all have to come out, then go back in correctly, with new clips on any that broke during removal. The time and clip cost can exceed DIY savings on these vehicles. Worth doing once to learn your specific car’s pattern; not worth it if every change becomes a frustration.
Powertrain warranty considerations. Most manufacturers honor DIY oil changes for warranty purposes as long as you keep records and use the correct oil specification. A small number of high-performance vehicles (some BMW, some Porsche) use dealer service tracking through software and may flag DIY changes on warranty claims. Read your warranty documentation if your vehicle is in this category.
Personal lift safety threshold not yet met. This is the one I take most seriously. If you are not confident in safely lifting and supporting your vehicle, do not learn on your back under it. A failed lift kills people. Pay 80 dollars at a quick-lube shop until you have invested in proper equipment and practiced lift technique on level ground in good lighting. Confidence in safe lifting is the price of admission for any DIY underbody work. There is no shame in deciding the threshold has not been met yet — the shame is in skipping that calculation and getting hurt.
Common Mistakes (and What They Cost You)
Five mistakes account for roughly 80 percent of the DIY oil change failures I have seen come into the shop after the fact.
The double-gasket failure. The old filter gasket sticks to the engine block when the old filter comes off. You install the new filter against the stuck old gasket. Two stacked rubber rings cannot seal — oil pumps out at full pressure within 30 seconds of startup. By the time you notice the puddle, the engine may have run dry. Catastrophic on a hot startup, recoverable if caught immediately. Prevention: every time you remove an old spin-on filter, check the engine block where the gasket sealed. Old gasket comes off with the filter, you are fine. Old gasket stuck to the block, peel it off with a fingernail before installing the new filter.
Overtightening the drain plug. Without a torque wrench, almost everyone overtightens. Steel plug, soft aluminum pan, repeated overtightening strips the pan threads. Result: oil pan replacement, 500 to 1,500 dollars depending on the vehicle. Prevention: use a torque wrench every time, set to the spec in the manual.
Wrong oil viscosity. Modern engines have specific oil pump volumes and bearing clearances designed for the spec viscosity. Substituting heavier oil “for protection” or lighter oil “for fuel economy” causes real problems. Heavier oil flows slower at startup, extending the dry-bearing window. Lighter oil reduces protective film thickness at operating temperature. Prevention: check the oil cap or manual every single time. The spec is on the cap for a reason.
Forgetting the new crush washer. Reusing the old crush washer or forgetting to install one at all causes the drain plug to leak. The leak is gradual, often missed until the next oil-life-monitor reset cycle when the oil level is suddenly low. Prevention: new crush washer goes on before the plug threads in. Buy a small bag of crush washers — they are 50 cents each — and keep them with your oil change supplies.
Not torque-checking the filter. A filter that is too loose leaks; one that is too tight requires a breaker bar to remove next time and often gets damaged in the process. Prevention: hand-tight plus three-quarters of a turn from gasket contact. No filter wrench for installation. The filter wrench is a removal tool, not an installation tool.
How Often Should You Change Your Oil?
Three sources of truth, in order of priority. First, your owner’s manual specifies an interval for normal service and a shorter interval for severe service. Use the severe interval if you qualify (more on that below). Second, if your vehicle has an oil-life monitor, trust it — these systems measure actual operating conditions and are more accurate than any fixed mileage number. Third, when in doubt, default to 5,000 miles for conventional oil, 7,500 miles for synthetic blend, and 10,000 miles for full synthetic in modern engines under mixed conditions.
Time still matters. Change oil at minimum once per year regardless of mileage. Oil oxidizes and accumulates moisture even when the car sits unused.
Severe service applies to most American drivers even though most do not realize it. Severe-service conditions include: frequent trips under five miles where the engine never reaches full operating temperature, stop-and-go commuting, towing or hauling, driving in temperatures below zero or above 90 Fahrenheit, dusty roads, and sustained mountain driving. If two or more of these describe your typical week, you are on severe service — cut the manual’s normal interval roughly in half. Our car maintenance schedule guide covers the full milestone-by-milestone schedule, and our synthetic vs conventional oil deep dive explains why synthetic outperforms conventional oil in cold flow, heat resistance, and overall service life.
For older vehicles past 75,000 miles, our best motor oil for high mileage guide covers the formulations with seal conditioners that matter more as engines age. For modern daily drivers and turbocharged engines, our best synthetic motor oil roundup ranks the formulations with verified cold-flow performance and consistent additive packages.
Final Thoughts from the Shop
The first oil change you do yourself will take twice as long as the second one and three times as long as the tenth one. That is the learning curve, and it is steeper than the work itself warrants because the first time you are figuring out where everything is, what every fastener looks like, and how the components fit together on your specific vehicle. Get through the first one carefully, take notes on the location of the drain plug, the filter type and size, the drain plug torque spec, and the oil quantity, and the second one is a routine 30 minutes.
The savings are real. Between 40 and 70 dollars per change versus a quick-lube shop, several times that versus a dealer. Across 200,000 miles at 7,500-mile intervals, that is 25 to 30 oil changes — anywhere from 1,200 to 2,000 dollars in total savings. More valuable, in my view, is the connection to your own vehicle. Owners who do their own oil changes notice oil leaks earlier, see the condition of the underbody every few months, and develop the kind of mechanical literacy that pays off across every other aspect of vehicle ownership. The first one teaches you the most. The fiftieth one is meditative.
If you do nothing else from this guide, do these three things on every oil change. First, always use the exact oil viscosity specified in the manual — never substitute heavier “for protection.” Second, always use a torque wrench on the drain plug — the cost of one stripped oil pan dwarfs the cost of the wrench. Third, always check the engine block for a stuck filter gasket before installing a new spin-on filter — the double-gasket failure is the worst-case mistake and the easiest one to prevent. Get those three right and the rest of the job is just patience and clean-up.
Welcome to DIY. The deal is straightforward: an hour of your time on a Saturday morning, a torque wrench, and the willingness to do it right. The payoff is a longer-lasting engine, real money saved, and the quiet satisfaction of taking care of your own car. Plenty of mechanics started exactly here.
Buyer's Guide
Six factors determine whether a DIY oil change is the right call for your specific vehicle and situation. Get these right and the work itself becomes routine.
Your Vehicle's Ground Clearance
The single biggest variable in DIY oil change difficulty is whether you can physically reach the drain plug and oil filter without lifting the vehicle. Most full-size pickups, SUVs, and crossovers have enough factory ground clearance that a typical adult can slide under the front end on a creeper without lifting at all. Mid-size sedans and compact crossovers usually need ramps or a jack-and-stands setup to reach the components comfortably. Sports cars, lowered vehicles, and any vehicle with extensive front-end aerodynamic trays require lifting and often the removal of a plastic skid plate before the drain plug becomes accessible. Match the equipment investment to your vehicle. A pickup owner can do oil changes with a creeper and a few basic tools. A Civic owner needs ramps. A Miata owner needs ramps plus tools to remove the front splash shield.
Oil Type and Change Interval
Modern vehicles fall into roughly three buckets. Daily drivers spec full synthetic on 7,500 to 10,000-mile intervals, which means three to four changes per year for an average driver. The cost-benefit math for DIY is solid — the savings per change are real and the labor is occasional. High-performance and turbocharged vehicles often spec premium full synthetic on 5,000-mile intervals or shorter, which means six to eight changes per year. The DIY savings compound, and the consistency of doing it yourself is genuinely valuable on engines where the wrong oil causes real problems. Older vehicles or those running conventional or synthetic-blend oils on 3,000 to 5,000-mile intervals are also strong DIY candidates because the change frequency is high. The case where DIY makes less sense is leased vehicles where the dealer service is bundled into the lease cost and skipping it has paperwork implications.
Tools and Workspace
The basic tool set is modest and pays back permanently. A floor jack rated for your vehicle weight, two jack stands (or a pair of ramps), an oil drain pan with at least 8-quart capacity, the correct socket for your drain plug (usually 13mm to 19mm depending on the vehicle), an oil filter wrench sized for your specific filter, a torque wrench reading in the 20 to 50 lb-ft range, a funnel, a magnetic LED work light, nitrile gloves, and shop towels. Total investment for someone starting from zero is around 200 to 300 dollars for quality versions of each — recovered in three to four oil changes versus shop pricing. Workspace requirements are minimal: a level surface, ideally concrete, with enough room to move around the vehicle and get cardboard or a drip pan under the work area to catch the inevitable drips. A garage is convenient but not required — a flat driveway works fine in good weather.
Filter Type and Engine Layout
Two main filter designs in modern vehicles, with very different DIY profiles. Spin-on canister filters are the traditional design — a sealed metal canister that threads onto a stub on the engine block. Removal is straightforward with a filter wrench, installation is hand-tight plus a defined turn, and the only common mistake is leaving the old gasket stuck to the engine when removing the old filter. Cartridge filters are increasingly common on European vehicles and newer domestic engines. The filter element is a paper cartridge inside a permanent housing on the engine, accessed by removing a cap and pulling the element out. Cartridge filters are usually easier to access from the top of the engine, but they require a specific cap socket or wrench, and the O-rings on the cap and housing must be replaced with each service. Identify which type your vehicle uses before you start. Buying the wrong filter design at the parts store will end the project before it begins.
Local Used Oil Disposal Options
Used oil is hazardous waste and cannot be disposed of in regular trash, drains, or the ground — and this is enforced. The good news is disposal is free and easy almost everywhere in the US. AutoZone, O'Reilly Auto Parts, Advance Auto Parts, Walmart Auto Care Centers, and most municipal hazardous waste facilities accept up to five gallons of used motor oil per visit at no charge. The same locations typically accept used oil filters. Earth911's locator at search.earth911.com finds the nearest options for any zip code. The practical workflow is to keep a sealed five-gallon empty oil container in the garage, transfer used oil from the drain pan into it after each change, and take it in once it gets close to full. The container the new oil came in works perfectly for this. The disposal step is the part beginners worry about most and is genuinely the easiest part of the whole process.
When to Take It to a Shop Anyway
Some situations belong at a shop even for confident DIYers. A drain plug that comes out crossthreaded or with rounded edges has stripped the oil pan threads — a thread repair kit or oil pan replacement is shop work. A filter housing that crossthreads or strips on installation is similar — the engine needs proper repair, not a workaround. Vehicles under the manufacturer's powertrain warranty where the dealer monitors service intervals through their software may flag DIY oil changes as a warranty risk on certain claims (rare, but real on some German marques). Vehicles with extensive plastic underbody panels that require multiple specialized clips and fasteners to remove and reinstall sometimes cost more in time and clip replacements than the DIY savings justify. And finally — if you are not confident in safely lifting the vehicle, that is a non-negotiable shop job. A botched lift kills people. Pay the 80 dollars at a quick-lube shop rather than gamble. Confidence in safe equipment use is the price of admission for DIY work, and there is no shame in deciding the threshold has not been met yet.
Frequently Asked Questions
Can a beginner really do an oil change at home?
Do I need to warm the engine before draining the oil?
Ramps or jack stands — which is safer for an oil change?
What happens if I use the wrong oil weight in my engine?
How do I reset the oil change light after a DIY oil change?
Related Articles
About the Reviewer

Mike Reeves, ASE Master Technician
A.A.S. Automotive Technology, Universal Technical Institute (UTI)
Mike Reeves is an ASE Master Technician with 15 years of hands-on experience in automotive repair and diagnostics. He earned his A.A.S. in Automotive Technology from UTI and runs his own independent shop in Denver, Colorado. Mike founded RevRated to help everyday car owners make smarter parts decisions -- every recommendation comes from real-world testing in his garage.