How to Remove Scratches From Car Paint: An ASE Master Tech's Guide (2026)
By Mike Reeves, ASE Master Technician Updated
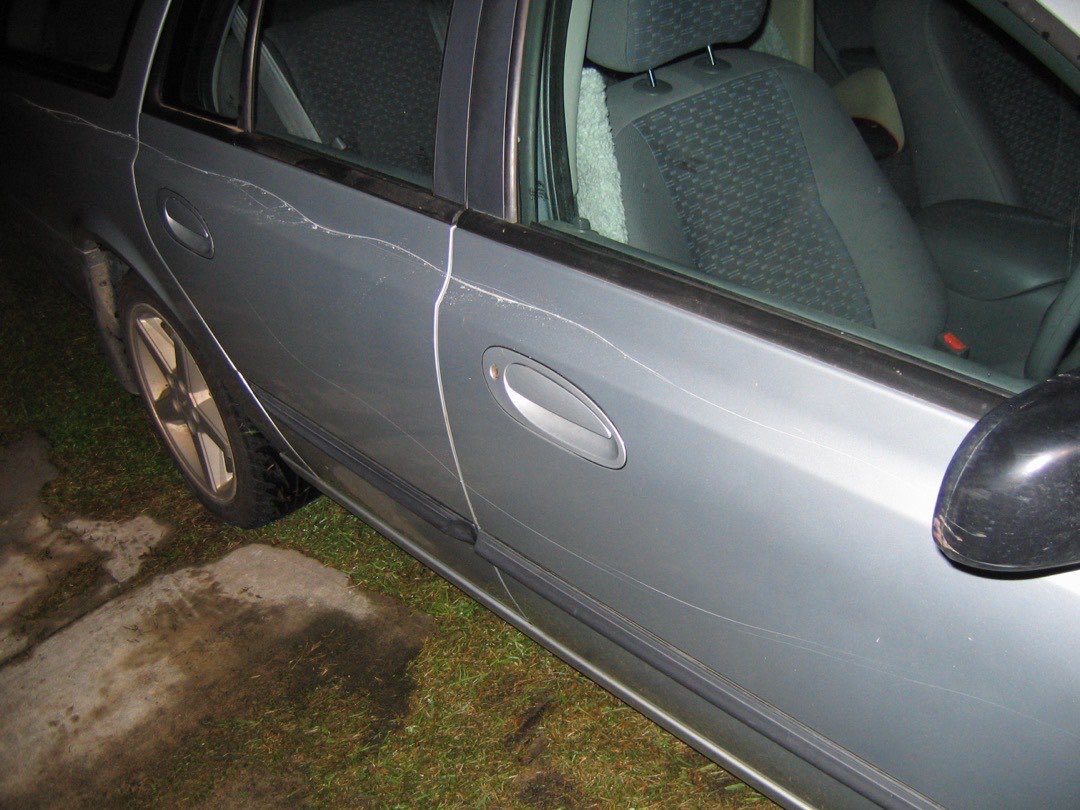
A customer rolled a silver wagon into the bay last spring with a key line running the length of both doors on the driver’s side. He had spent a weekend on it with toothpaste, then rubbing compound and a bath towel, and by Sunday one scratch looked better while the other had a dull, chalky patch on the body line where he had rubbed through the clear coat. The first scratch had been a polish job all along. The second had gone to primer the moment the key touched it, and no amount of rubbing was ever going to fix it. He had two different problems and treated them the same way.
That is the mistake I see most. People reach for a product before they know how deep the damage goes, and depth decides everything. Here is the short answer. Run a fingernail across the scratch and wet it with water. If the nail glides and the mark nearly vanishes when wet, it is almost certainly in the clear coat, and compound and polish will remove it. If the nail catches but you still see only clear in the groove, wet sanding followed by compound and polish can level it, provided you have the paint thickness to spare. If you see a different color in the groove (gray or white primer, or bare metal), nothing will remove it: you fill it with touch-up paint or take it to a body shop. Our best car scratch removers guide covers the products for the first path. This guide covers how to tell which path you are on and how to do each one safely.
Step One: Find Out How Deep the Scratch Goes
Factory paint is built in layers. On the bare metal (or plastic, on a bumper) sits an e-coat and primer layer for corrosion protection and adhesion. Over that is the base coat, which carries the color but no gloss. On top is the clear coat, the transparent layer that supplies the shine and takes the abuse. Almost every scratch you can fix at home lives entirely inside that clear layer.
The fingernail test is the one AAA and Meguiar’s both recommend. Clean the area and drag a fingernail slowly across the scratch. If it slides over without catching, the scratch is shallow and in polish territory. If it catches, the scratch has an edge deep enough to feel.
The water test is my favorite second opinion. Wet the scratch and look at it from a few angles. Water fills the groove and bends light far closer to the way clear coat does than air does, so a scratch that disappears or nearly disappears when wet is usually confined to the clear. One that stays sharp and visible when wet is deeper, or has exposed a different layer.
Both tests can mislead, and you should know how. A catching nail only proves the scratch has an edge. Plenty of nail-catching scratches are still in clear coat and come out with wet sanding. The opposite error is worse: on a dark car, a fine scratch can look shallow from one angle and show a thin white line of primer from another. Look straight down into the groove with a bright flashlight. Color in the groove is the only test that settles it. Gray, white, or a shade different from the paint around it means primer. Shiny silver means metal.
Also check whether it is a scratch at all. A raised mark, or a different color sitting on top of your paint, is often paint transfer from a bumper, a garage wall or a shopping cart. That is foreign material resting on your clear coat, and it often comes off with polish, a clay bar or a dab of compound. I have watched people wet sand a transfer mark that would have wiped off.
How Much Clear Coat You Actually Have
This is the part retailer guides skip. Every scratch repair short of touch-up paint works by abrasion. Compound levels a scratch by lowering the clear coat around it until the surface meets the bottom of the groove. That clear is thin, and it does not grow back.
Factory clear coat usually runs about 1.5 to 2.0 mil thick, roughly 35 to 50 microns, and the total factory film (primer, base and clear together) usually lands around 4 to 7 mil, about 100 to 180 microns. DeFelsko, which makes the coating thickness gauges body shops use, notes that vehicle makers commonly advise removing no more than about 0.3 mil of clear, roughly 8 microns, during correction. That is a small budget, and it has to last the life of the car.
A paint depth gauge turns guessing into measuring. It reads total film thickness, and readings vary across a car, so take several per panel and note the low ones. Detailers use a rough rule of thumb, and I treat it as a guideline only: total readings above about 100 microns are reasonably safe for normal polishing, while readings below 80 to 90 microns call for caution and the least aggressive method that works. A reading far above the rest of the car, say double or more, usually means the panel has been repainted, and refinish clear can behave differently under a pad than factory clear.
Edges and body lines carry the least paint. Paint pulls away from sharp edges as it cures, and a pad or sanding block bears down harder on a crease than on the flat around it. That is exactly how the wagon owner burned through. Keep compound, pads and sandpaper off edges and creases, or tape them off before you start.
What You’ll Need
Match the kit to the depth. A light scratch needs only the first two groups.
For assessment and prep:
- A bright LED flashlight or detailing light for inspection
- pH-neutral car wash soap and a clean wash mitt
- A clay bar kit to pull bonded contamination before any abrasive touches the paint (our clay bar picks)
- Low-tack painter’s tape for edges, trim and body lines
- A stack of clean microfiber towels kept separate from shop rags (the towels we trust on paint)
- A paint depth gauge if you plan to wet sand or machine-correct a whole panel
For light scratches and swirls:
- A cutting compound and a finishing polish, or a one-step product for very light marks
- Foam hand applicators, or a dual-action polisher with cutting and finishing pads
For moderate scratches:
- Wet-or-dry automotive sandpaper in 1500, 2000 and 3000 grit
- A small, firm sanding block and a spray bottle of water with a drop of car soap
For scratches into color or primer:
- Touch-up paint matched to your paint code, plus touch-up clear coat
- Automotive primer for anything down to bare metal, and fine brushes or micro-tip applicators
For the finish:
- A wax, sealant or ceramic coating to replace the protection the correction removes
Fixing Light Scratches and Swirls
Swirls from washing, fingernail marks around door handles and a branch dragged along a fender all sit in the clear coat, and all come out with abrasive polishing.
Labels muddy the terms, so here they are. A rubbing compound, also called a cutting compound, is the coarse stage. It carries larger, harder abrasive particles that remove clear coat quickly to level a scratch, and on its own it leaves a fine haze of micro-marring. A polish is the fine finishing stage. Its smaller abrasives remove far less material and refine that haze back to full gloss. Some brands call a coarse product a “polishing compound,” so go by the cut rating on the label. One-step scratch and swirl removers sit in between. Our scratch remover roundup sorts the current products by which stage each one really is.
The sequence I use:
- Wash and dry the car properly, then clay the area. Abrasives on dirty paint grind that dirt in. Our scratch-free wash guide covers the wash.
- Pick a test spot on the damaged panel and start with the least aggressive combination: polish on a finishing pad. Step up only if it does not move the scratch.
- Work small. By machine, about a 2 by 2 foot section. By hand, a few inches square with a pea-sized dab on a foam applicator, worked with firm, overlapping strokes for 20 seconds or so.
- Wipe and inspect. Remove the residue with a clean microfiber and check under a point light, a flashlight or direct sun. Diffused light hides marring the sun will show you tomorrow.
- Step up only if needed. If polish did not do it, use compound on the same spot, then polish away its haze.
Hand versus machine is a real decision. By hand you can fix a single scratch or a small patch of swirls with little risk of burning through, but past a square foot or two it gets slow and uneven. A dual-action polisher oscillates the pad as it spins, which keeps heat down and makes paint hard to damage, and it does in minutes what takes an hour by hand. If the whole car is swirled, buy the machine. The best car polishers guide matches machines to experience levels. Leave rotary polishers to experienced hands: they cut fast, build heat quickly and burn edges.
Pads matter as much as product. Microfiber and firm foam cutting pads cut hardest, medium foam pads polish, and soft foam pads finish. Prime a fresh pad lightly, use moderate, even pressure, and keep the pad flat. Tilting it loads the pressure onto its edge, which is how holograms and burn-throughs start. Clean the pad every section or two, since a clogged pad cuts unevenly.
Each pass costs paint. Detailers commonly estimate that a polishing pass removes somewhere around 1 to 5 microns, depending on the product, the pad and the machine. Treat that as a working range, and it is the reason I start gentle and stop the moment the scratch is gone.
Fixing Moderate Scratches With Wet Sanding
Wet sanding is for a scratch that is still in the clear coat but too deep for compound alone to level in a reasonable number of passes. Two conditions have to be true before you start. The groove has to show no color under a flashlight. And you need clear to spare, ideally confirmed with a gauge, because sanding plus the compound and polish that follow can remove roughly 10 to 15 microns by common detailer estimates. That is more than the conservative OEM guidance above, so save wet sanding for spot repairs that justify it.
Sources disagree on the starting grit. Some say 1500, some 2000, some 3000. My answer is to start as fine as will work, which on most cars means 2000 or 3000, and step down to 1500 only if the finer paper makes no progress after several careful passes. Coarser paper levels faster, but its marks have to come back out with finer grits, which costs clear too. Never skip a grit on the way back up. If you start at 1500, you go to 2000, then 3000, then compound, then polish.
The method:
- Soak the sandpaper in soapy water for at least 10 minutes, and keep the surface wet the entire time. Dry sanding clogs the paper and gouges the clear.
- Wrap the paper around a small, firm block. Fingertips put uneven pressure on the surface and sand grooves of their own.
- Sand in straight lines with light pressure, along the length of the scratch and slightly past each end. Keep the sanded area as small as the scratch allows.
- Wipe and look often. You want a uniform dull haze, with the bottom of the scratch just disappearing into it.
- Stop the moment the scratch is gone. Stop as well if any color shows up in the slurry or on the paper. Color in the water means you have reached base coat, and more sanding only makes the damage bigger.
- Stay well away from edges and body lines, and tape them.
Then compound the sanded area until the haze is gone, and finish with polish. A dual-action polisher makes this stage far easier.
Fixing Scratches That Reach Color or Primer
Once a scratch has gone through the clear, abrasives cannot help. Polishing lowers the clear around the groove, but the groove is a missing slice of color with nothing underneath to reveal. The repair is to fill it.
Start with your paint code. On most vehicles it is printed on a label in the driver’s door jamb. If not, a dealer parts counter can look it up from the VIN. Order touch-up paint by that code, along with matching touch-up clear coat. If the scratch reaches bare metal, add a small amount of automotive primer, because color applied straight to steel bonds poorly and does nothing to stop rust.
Clean the scratch with isopropyl alcohol or wax and grease remover, then apply in thin layers with a fine brush or micro-tip, filling the groove itself rather than painting the surface around it. One heavy coat sags, wrinkles and stays soft underneath. Several thin coats, about 15 to 20 minutes apart as most touch-up instructions specify, build up level and cure properly. Stop the color just below the surrounding surface and finish with clear.
Touch-up feels dry within an hour and is a long way from cured. Give it at least 48 to 72 hours before any leveling with fine paper or polish, and longer is safer for a spot repair. I prefer a week. Leveling soft paint drags it out of the groove, so wait.
On solid colors it can get close to invisible from normal viewing distance. Metallics are harder, because flakes lie differently from a brush than from a spray gun, so the repair reads darker or lighter by angle. Tri-coat and pearl finishes (many whites and deep reds) are the hardest of all, since their color comes from three layers interacting and a brush cannot reproduce that. On those finishes touch-up stops rust and makes the scratch less obvious. It rarely makes it disappear.
Do not let bare metal wait. Exposed steel rusts quickly, and rust that creeps under the surrounding paint makes the repair much bigger.
Scratch Removal Myths
Here is the mechanism behind each one.
Toothpaste. Most toothpaste contains a mild abrasive (hydrated silica or calcium carbonate), so it can dull the edges of a very fine scratch. You have no control over how hard that abrasive cuts on paint, no lubrication designed for clear coat, and no way to finish the surface afterward. The usual result is a hazy patch with the scratch still visible. My verdict: a weak, uncontrolled compound. A real finishing polish does the same job properly.
WD-40 and other oils and glazes. These fill the groove and bend light so the scratch looks less obvious. Nothing has been removed, and the first wash or two takes the filler away and the scratch comes back. My verdict: a cosmetic mask that lasts days, useful at most for photos.
Magic eraser. Melamine foam is an abrasive, closer to very fine sandpaper than to a sponge. Rubbed on clear coat, it scuffs the surface into a dull patch. My verdict: keep it off your paint.
Clear nail polish. It fills the groove with a material never designed for automotive use. It does not match your color and lacks UV stability, so it can yellow and peel in the sun. My verdict: use real touch-up paint and touch-up clear.
When to Go to a Body Shop
DIY repair stops being sensible in a few situations:
- The scratch reaches bare metal over more than a short line, or rust has started.
- The groove shows primer and the scratch is long or sits on a highly visible panel.
- The damage covers most of a panel, like a deliberate keying along both doors.
- Gauge readings are already low, or the panel has been repainted and you do not know what is under it.
- The car wears a tri-coat or pearl finish and you want the repair invisible.
- The scratch comes with a dent or crease. The metal has to be fixed first, and a shop will want to do both.
- It is a leased car near turn-in. A lease-end inspection will flag an obvious touch-up as readily as the original scratch.
A good body shop will often blend new paint into neighboring panels so the transition cannot be seen. That is a bill that runs well past the cost of every product in this guide combined, and on a panel-wide key scratch it is still the right answer.
Protect the Repair
Every compound and polish strips the wax or sealant from the area it touches, and corrected paint is bare clear coat. It should not stay that way. Wipe off polishing oils with a panel prep spray or diluted isopropyl alcohol, then protect it the same day.
A carnauba or synthetic car wax is the simplest option and adds warmth to the gloss, though it lasts from a few weeks to a couple of months. A paint sealant lasts several months and goes on just as easily. A ceramic coating lasts longest and adds a hard, slick layer that helps resist fine wash marring, but it locks in whatever is underneath, so apply it only to paint you are happy with. For areas that take constant abuse, like the door handle cups and the front bumper, paint protection film takes light scratches in place of the paint, and many films heal fine marks with warmth.
Prevention costs less than any of it: most swirls come from washing, so fix the wash routine.
Buyer's Guide
Most scratch repairs succeed or fail on product choice and paint condition before technique comes into it. These six factors decide which products belong on your shelf and how far you can safely take a repair.
Abrasive Type and Cut Level
Compounds and polishes are rated by how aggressively they cut. A cutting or rubbing compound uses coarse abrasive to level scratches and leaves a light haze, while a finishing polish uses fine abrasive to restore full gloss. One-step products sit between the two. Buy by the cut rating printed on the label, since brands use the word polish loosely. For most clear coat scratches a medium compound plus a finishing polish covers everything, and you try the polish first on a test spot.
Diminishing vs Non-Diminishing Abrasives
Diminishing abrasives break down into finer particles as you work them, so a single product starts with more cut and finishes finer. They need to be worked until they turn clear, which suits hand application. Non-diminishing abrasives keep a consistent particle size, cut predictably and wipe off sooner, and most modern products built for dual-action polishers work this way. Either type works. Follow the working time on the label, because stopping a diminishing product early leaves haze and overworking any product spends clear for no gain.
Applicator and Pad Choice
The pad or applicator changes the result as much as the liquid. By hand, use dense foam or microfiber applicators and turn to a clean face often. By machine, microfiber and firm foam pads cut hardest, medium foam pads polish, and soft foam pads finish. Pair a cutting pad with compound and a finishing pad with polish, keep separate pads for each product, and clean them every section or two. A pad clogged with spent residue cuts unevenly and can mar the paint it is meant to correct.
Hand vs Machine Application
Hand application suits a single scratch or a small patch of swirls. It is slow, and it is very hard to damage paint with. A dual-action polisher suits whole panels or a whole car, because it applies even pressure and motion over large areas and finishes far more consistently than an arm can. A rotary polisher cuts fastest and builds heat quickly, so it belongs in experienced hands only. If you plan to correct more than a square foot or two, a dual-action machine is worth buying.
Paint Depth and Color
Check how much paint you have before choosing how aggressive to be. Factory clear coat is usually about 35 to 50 microns thick, and edges and body lines carry the least. A paint depth gauge tells you whether a panel can take wet sanding or heavy compounding, and whether it has been repainted. Color matters too. Dark paints show every trace of haze, so they need a dedicated finishing polish. Metallic, pearl and tri-coat paints are hard to touch up invisibly, which pushes deep scratches on those finishes toward a body shop.
Follow-Up Protection
Compounds and polishes strip existing wax or sealant, so corrected paint needs new protection the same day. Wax is the easiest and gives a warm gloss but lasts the shortest time. A synthetic sealant lasts several months for similar effort. A ceramic coating lasts longest and helps resist fine wash marring, but it seals in whatever is underneath, so apply it only to paint you are happy with. Wipe the panel with a prep spray first so the protection bonds to clean clear coat instead of polishing oils.
The Bottom Line
Removing a scratch comes down to one decision made before you open any bottle: how deep it goes. Clear coat scratches come out with compound and polish, worked gently in small areas, starting with the finest product that does the job. Deeper scratches still inside the clear can be wet sanded, if a gauge, or at least a careful look, says you have paint to spend. Anything that shows color or primer gets filled with touch-up paint or goes to a body shop. Our scratch remover guide and polisher guide cover the gear for the first two paths.
The wagon got both treatments. The shallow scratch came out by hand with compound and polish in about twenty minutes. The deep one, along with the burned body line, went to a body shop for a blend across the door. Had he done the fingernail test, looked into the groove with a flashlight and started with polish, it would have been one quick driveway repair and one smaller shop job. Diagnose first, start gentle, and spend that thin layer of clear only when the scratch has earned it.
Frequently Asked Questions
Does toothpaste remove car scratches?
Can you buff out a scratch that catches your fingernail?
What is the difference between rubbing compound and polishing compound?
Does polishing remove clear coat?
Will touch-up paint fix a deep scratch?
Related Articles
How to Wash Your Car Without Scratching the Paint: An ASE Master Tech's Guide (2026)
car-care-detailing
7 Best Car Paint Sealants of 2026
car-care-detailing
How to Choose the Right Car Wax for Your Paint Type (2026): An ASE Master Tech's Guide
car-care-detailing
7 Best Car Polishers of 2026
car-care-detailing
7 Best Car Scratch Removers of 2026
car-care-detailing
About the Reviewer

Mike Reeves, ASE Master Technician
A.A.S. Automotive Technology, Universal Technical Institute (UTI)
Mike Reeves is an ASE Master Technician with 15 years of hands-on experience in automotive repair and diagnostics. He earned his A.A.S. in Automotive Technology from UTI and runs his own independent shop in Denver, Colorado. Mike founded RevRated to help everyday car owners make smarter parts decisions. He judges every pick the way he would for a customer's car: specs, fitment and what owners report over time.