How to Test a Car Battery: 6 Tests an ASE Master Tech Uses (2026)
By Mike Reeves, ASE Master Technician Updated
A slow crank on a cold morning tells you something is wrong. It does not tell you whether the battery is discharged, worn out, or innocent while the alternator or a cable takes the blame. Testing answers that in about fifteen minutes, and it decides whether you need a charger, a new battery, or a different repair entirely.
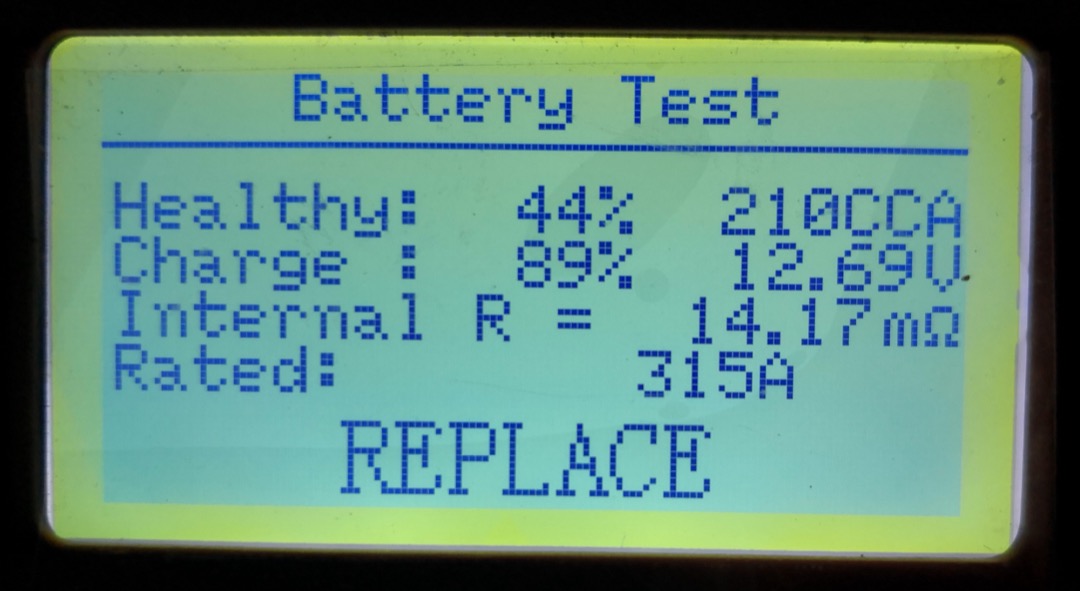
I have tested thousands of batteries at the counter and in the bay. The mistake I see most is a single multimeter reading treated as a verdict. Voltage at rest measures charge. It does not measure health, and the picture on this page shows the gap: a battery reading 12.69 volts that a conductance tester still failed at 44 percent of its rated capacity.
Below are the six tests, in the order I run them, with the numbers that actually mean something.
What You Need
Minimum: a digital multimeter, safety glasses, and a wire brush for the terminals.
Better: a handheld conductance tester, which checks cranking capacity against the battery’s rated CCA in about thirty seconds. Our car battery testers roundup compares the conductance units and the one true carbon-pile load tester worth owning.
Optional: a battery hydrometer, only for flooded batteries with removable caps.
Time: fifteen minutes for the first three tests, plus rest time if the battery was just charged or driven.
Step Zero: Clean Connections and Clear the Surface Charge
Look first. A bulged or cracked case, a leaking battery, or a strong rotten-egg smell ends the test there: that battery gets replaced, not diagnosed. Fluffy white or blue-green corrosion on the terminals adds resistance that can fail a good battery, so brush it off before measuring anything.
Then deal with surface charge, which is the step most home tests skip. A battery that just came off a drive or a charger carries a thin layer of extra voltage on its plates, and it reads a few tenths high until that bleeds off. Two ways to clear it. Let the car sit several hours, overnight if you can. Or switch the headlights on for about 30 seconds with the engine off, switch them off, and wait a couple of minutes before measuring. Skip this and a tired battery reads healthy.
Test 1: Resting Voltage with a Multimeter
Set the meter to DC volts, 20 V range if it is not auto-ranging. Engine off, key out, doors shut. Red probe on the positive post, black on the negative post, on the lead itself rather than the clamp bolt.
For a 12-volt flooded lead-acid battery at rest near 77 degrees F, these are the reference figures:
| Resting voltage | State of charge |
|---|---|
| 12.6 to 12.7 V | 100 percent |
| about 12.45 V | 75 percent |
| about 12.24 V | 50 percent |
| about 12.06 V | 25 percent |
| 11.9 V or below | fully discharged |
Why published charts disagree. Search this and you will find charts that call 12.6 volts full and others that call it 75 percent. Both can be right, for different batteries. Resting voltage tracks electrolyte strength: each cell sits at roughly its specific gravity plus 0.84 volts. A battery filled to a specific gravity of 1.265 reads about 12.6 volts when full. One filled to 1.280 or 1.300, which covers many AGM and heavy-duty batteries, reads 12.7 to 12.9 volts when full. So an AGM battery reading 12.6 volts may genuinely be down a quarter. If your battery’s label or maker publishes a full-charge voltage, trust that over any generic chart. The other two reasons charts drift are the ones above: surface charge not cleared, and temperature not normalized.
What this test tells you: charge level. Anything below 12.4 volts means charge it fully before you judge it. Our guide to charging a car battery covers rates, times, and the AGM setting. A battery that will not climb past about 10.5 volts on any charger has a shorted cell, and it is finished.
What it cannot tell you: capacity. For that you need Test 2 or Test 5.
Test 2: Cranking Voltage
Leave the meter on the posts, set to MIN/MAX or peak-hold if it has one. Disable the fuel pump fuse or relay if you do not want the engine to start, or just let it start. Have a helper crank for no more than 10 to 15 seconds while you watch the lowest reading.
- Above about 10 V while cranking a warm engine: the battery is delivering.
- 9.6 V to 10 V: marginal. Retest after a full charge.
- Below 9.6 V at around 70 degrees F: failing. That is the same line a formal load test uses.
Adjust for cold. The standard pass line drops to about 9.4 volts at 50 degrees F, 9.1 volts at 30 degrees F, and 8.5 volts at 0 degrees F.
This is where a battery that passed Test 1 at 12.6 volts gets caught. Voltage that collapses under load, from a full resting charge, is lost capacity, usually sulfation or age. No charger fixes it.
One refinement that saves people from buying batteries they do not need: while your helper cranks, move the probes from the posts to the cable clamps. If the clamps read more than about 0.3 volts lower than the posts, the drop is in the connection, not the battery. Clean or replace the terminal ends, and a proper socket set makes that a five-minute job.
Test 3: Charging System Voltage
A new battery in a car with a weak alternator is dead again within weeks, so check the charging side before condemning anything. Start the engine and measure across the posts at idle, then at about 2,000 rpm, then again with the headlights, blower on high, and rear defrost switched on.
On a conventional charging system, expect roughly 13.5 to 14.8 volts. The exact target moves with temperature: cold batteries are charged at the high end, hot ones at the low end.
- Below about 13.2 V with loads on: the alternator is not keeping up. Suspect the alternator, the belt, or the charging cable.
- Above about 15 V: overcharging. A failing regulator will cook a battery.
A trap on newer vehicles: many GM, Ford, and European cars run smart charging, where the engine computer deliberately drops alternator output to around 12.6 to 13 volts once the battery is judged full, to save fuel. A low reading on those cars can be normal. Turn on heavy loads and the voltage should come up. If it does not, or the car logs a charging code, a capable OBD2 scanner will read what the module sees, and our OBD2 code guide explains where to start.
Test 4: Specific Gravity with a Hydrometer
This one is only for flooded batteries with removable caps. AGM, EFB, gel, and sealed maintenance-free batteries cannot be tested this way, and prying at their vents to try damages them.
With the battery fully charged and rested, draw electrolyte from each cell in turn and read the float. Glasses and gloves on, because this is sulfuric acid.
- About 1.265 at 80 degrees F: fully charged on a typical battery. Some batteries are built to 1.280 or higher, so check the maker’s figure.
- Temperature correction: add 0.004 for every 10 degrees F above 80, subtract 0.004 for every 10 degrees below.
- The number that matters most: spread between cells. A difference of 0.050 or more between the highest and lowest cell means one cell is failing, and the battery should be replaced even if the average looks fine.
This is the only home test that looks inside individual cells, which is why old-school techs still keep a hydrometer on the bench.
Test 5: Conductance Tester
This is what nearly every parts store and dealer uses now. The tester sends a small AC signal through the battery, measures how easily it passes, and calculates cranking capacity from that. Clip it on, enter the rating from the battery label, pick the chemistry, and read the verdict.
Two things decide whether the result is trustworthy. First, enter the rating standard that matches the label. CCA (SAE) and EN numbers are different scales, and entering an EN figure as SAE CCA skews the result. Second, test a charged battery. A deeply discharged battery gives an unreliable capacity reading, which is why testers return a “charge and retest” verdict. Take it at its word.
The cover photo on this page is the case every owner should understand. The battery read 12.69 volts, about 89 percent charged by voltage. Its conductance result was 210 CCA against a 315 amp rating, 44 percent health, and the verdict was replace. That battery would have passed a multimeter check and failed on the first cold morning.
A good handheld also runs Tests 2 and 3 automatically, including an alternator ripple check that catches a failing diode. Our battery tester roundup covers which units handle AGM, EFB, and lithium profiles.
Test 6: Carbon-Pile Load Test
The traditional method. A load tester draws a heavy current, typically half the battery’s CCA rating, for 15 seconds, then reads the voltage at the end. The pass line is the same temperature table from Test 2: 9.6 volts at 70 degrees F and above.
Two rules. The battery must be at least 75 percent charged, about 12.45 volts, before loading it, or the test fails a good battery for being flat. And do not repeat it back to back. A load test is real stress, and running it three times in a row on a marginal battery can finish it off, which is one reason shops moved to conductance testing.
If the Battery Tests Good but Keeps Going Flat
A battery that passes every test above and is dead again two days after a full charge is almost always the victim of a parasitic draw.
To measure it, set the multimeter to DC amps, disconnect the negative cable, and connect the meter in series between the cable and the post. Close the doors, latch the hood switch or trick it closed, and wait. Modules take 20 to 45 minutes to go to sleep. A healthy modern car settles around 20 to 50 milliamps. Anything that stays above roughly 85 milliamps is worth chasing: pull fuses one at a time until the current drops, and that circuit holds the fault.
The usual suspects are glovebox and trunk lights, aftermarket stereos and remote starters, and hardwired dash cams running parking mode with no low-voltage cutoff. If you run a dash cam in parking mode, set its cutoff to 12.2 volts or higher.
Our battery maintenance guide covers keeping a healthy battery above 12.4 volts once the draw is fixed.
Reading the Results Together
The tests only mean something in combination:
- Low resting voltage, good cranking and conductance after a full charge: discharged, not failed. Charge it and find out why it went flat, whether short trips, a draw, or the alternator.
- Good resting voltage, collapses when cranking or fails conductance: lost capacity. Replace it.
- Will not climb past about 10.5 volts on a charger: shorted cell. Replace it.
- Good battery, low charging voltage with loads on: alternator or belt. Fix that first or the new battery dies too.
- Good battery, good charging, dead after a few days parked: parasitic draw.
If you are stranded before you get to any of this, a jump starter gets you home, and our jump starting guide covers doing it safely on a modern car. A jump pack starts the engine but puts almost nothing back into the battery, so charge it properly afterwards with a smart battery charger before you trust the next test.
Final Word from the Shop
Clear the surface charge, read resting voltage, then load the battery one way or another, because a multimeter alone will pass a battery that is about to strand you. Check the alternator before you buy a replacement. Test twice a year, in the fall and late spring, and at every oil change once the battery is past three years old.
The two numbers I would remember: 12.6 volts at rest on a typical flooded battery, and 9.6 volts under load at room temperature. Everything else on this page explains why those numbers can mislead you, and what to check next when they do.
Frequently Asked Questions
What voltage is too low to start a car?
Can you test a car battery without a multimeter?
How often should you test a car battery?
Why does my battery test good but the car still won't start?
Does cold weather affect a battery test?
Related Articles
How to Charge a Car Battery with a Charger: An ASE Master Tech's Guide (2026)
car-electronics
7 Best Car Battery Chargers of 2026
car-electronics
9 Best Car Battery Testers of 2026
car-electronics
Car Battery Maintenance Guide: How to Extend Your Battery's Life (2026)
maintenance-parts
7 Best Jump Starters of 2026
car-electronics
About the Reviewer

Mike Reeves, ASE Master Technician
A.A.S. Automotive Technology, Universal Technical Institute (UTI)
Mike Reeves is an ASE Master Technician with 15 years of hands-on experience in automotive repair and diagnostics. He earned his A.A.S. in Automotive Technology from UTI and runs his own independent shop in Denver, Colorado. Mike founded RevRated to help everyday car owners make smarter parts decisions. He judges every pick the way he would for a customer's car: specs, fitment and what owners report over time.