How to Detail Your Car Like a Pro: An ASE Master Tech's Complete Walkthrough (2026)
An ASE Master Tech's full car-detailing walkthrough — wheels first, the iron-remover step nobody explains, the right order for interior, and the mistakes that scratch your paint.
Updated
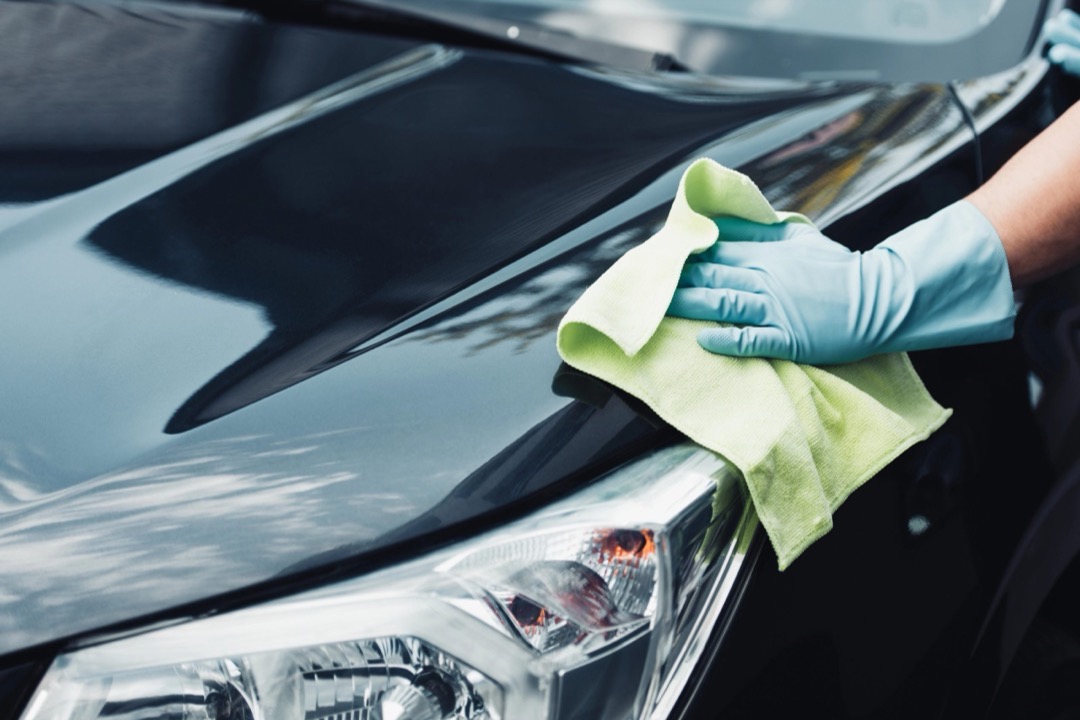
A customer brought me a three-year-old black sedan a few summers ago, frustrated that the paint never looked as good after his weekend wash as it did the day he drove it off the lot. He was using premium soap. He was using soft microfiber mitts. He had a foam cannon and a pressure washer. He was doing everything the YouTube videos told him to do. And in direct sunlight, the paint was a hazy mesh of fine spiderweb swirls he could not see at most angles but could not unsee once he noticed them. He thought he had bad paint from the factory. He did not. He had been washing the car in circles, in direct afternoon sun, with the same mitt he used on the wheels, and he had been doing it once a month for three years. Every wash was adding marring to the paint while the foam and the premium tools made him feel like he was doing the right thing.
That is the gap between detailing and detailing like a pro. The difference is not the tools — anyone can buy the tools. The difference is sequence and technique. Wheels first because brake dust will splatter onto clean paint if you wash the car first. Straight-line wash motions because circular motions concentrate every grain of grit into a tight swirl mark. Iron remover before clay bar because chemical decontamination is faster than mechanical decontamination and removes the embedded particles that would otherwise drag across the clear coat. Glass last because every other step puts overspray on the windows. None of this is intuitive. All of it is what separates a five-hour Saturday that makes your car look new from a five-hour Saturday that makes it look about the same as before with new swirl marks.
I am Mike Reeves, an ASE Master Technician with twenty-plus years on the shop floor. I have detailed thousands of vehicles — customer cars, my own collection, friends’ projects — and watched dozens of well-meaning DIYers make the same correctable mistakes. This is the full sequence I would give to a family member, with the honest reasoning behind every step, the tools that matter, and the mistakes that cost paint. Two thousand words of process, no marketing fluff, no “consult a professional” hedging on the parts you can absolutely do yourself. Block out a Saturday, work through it in order, and your car will look better than it has since you bought it. That is the deal.
How Long Does It Take to Detail Your Own Car?
The honest answer most articles dodge. On a daily driver with moderate contamination, four to six hours total. Here is the breakdown by phase so you can plan your day:
| Phase | Time | What You’re Doing |
|---|---|---|
| Wheels and tires | 25–35 min | Wheel cleaner, brush each wheel face and barrel, dress the tires |
| Pre-wash and foam | 15–20 min | Foam cannon application, dwell time, pre-rinse |
| Two-bucket contact wash | 35–45 min | Top-down wash, straight-line motions, dedicated mitts |
| Chemical decontamination | 15–20 min | Iron remover spray, watch the purple bleed, rinse |
| Clay bar pass | 25–35 min | Lubricated clay across every painted panel |
| Drying and inspection | 15–20 min | Microfiber towels, leaf blower for trim, panel check |
| Wax or sealant | 30–45 min | Apply, allow to haze, buff off panel by panel |
| Engine bay (optional) | 25–30 min | Cold engine, degrease, rinse, dress rubber |
| Interior — vacuum and hard surfaces | 45–60 min | Clear out, vacuum, vents and console, dashboard |
| Interior — seats, carpet, glass | 30–45 min | Upholstery, floor mats, final glass pass |
That table is the honest plan. Skip the polish step (which I will cover separately) and a daily driver gets the full treatment in one Saturday with a lunch break. Add polish for a neglected car and budget eight hours.
The Right Order — and Why It Matters
Every detail guide on the internet gives you a sequence. Almost none of them tell you why the sequence is what it is. The reasoning is what makes the difference between following a recipe and actually understanding the work.
Wheels and tires first, always. Brake dust is the dirtiest material on the vehicle and the wheel cleaning chemistry is the most aggressive. If you wash the car first and then move to the wheels, brake dust splatter and aggressive cleaner overspray hit clean paint. Doing wheels first means everything that splashes during the wheel step lands on dirty paint you are about to clean anyway.
Top down, never circles. Gravity pulls dirt downward. Wash the roof first, then the upper panels, then the lower panels, with the dirtiest lower panels — rockers, lower doors, rear bumper — washed last with a dedicated mitt. Straight-line motions, front to back of the vehicle, never circles. Every circular wash motion concentrates grit particles into a tight orbital pattern that becomes a visible swirl mark in direct sunlight. Straight lines spread any potential marring across a larger area where it is far less visible.
Decontaminate before you protect. Wax over embedded iron particles seals them onto the paint where they continue oxidizing under the protective layer. Six months later you have rust nucleation sites that started the moment you waxed without decontaminating. Two minutes of iron remover and a clay bar pass prevents months of damage you would otherwise be paying for next year.
Glass always last. Dashboard protectants, interior cleaners, and exterior wax all create overspray and drift that lands on glass. Cleaning glass first and then doing everything else means you redo the glass at the end anyway. Doing it last means one clean pass.
Phase 1 — Wheels and Tires
Brake dust is iron particles, brake pad binder material, and road grime fused together by heat. It is the most aggressive contamination on the vehicle and it requires the most aggressive cleaning chemistry. A pH-neutral wheel cleaner is fine for weekly maintenance. For a full detail, use a dedicated iron-removing wheel cleaner — the kind that reacts with embedded iron and turns purple as it works. Spray, let it dwell for two to three minutes (not on a hot wheel and never in direct sun), agitate with a wheel brush set that has a long-handle brush for the wheel face and a separate barrel brush for the inner surfaces, then rinse thoroughly.
Tires get a separate degreaser to strip old tire dressing and grease, scrubbed with a stiff bristle tire brush. Skip this step and any tire dressing you apply at the end will sling off within a few drives. The dressing comes later — after the wash, after the wheels are dry. For now, tires are getting cleaned, not dressed.
Use dedicated wheel-only brushes that never touch paint. Cross-contamination between wheel media and paint media is one of the most common causes of unexplained scratches.
Phase 2 — Pre-Wash and Foam
Modern detail technique uses a touchless pre-wash to break down the loose contamination before any physical contact with the paint. The lower the contact pressure between you and the paint during the contact wash, the lower the scratch risk. Pre-wash chemistry does that work without contact.
A foam cannon attached to a pressure washer is the gold standard. A foam gun attached to a regular garden hose is the workable version that costs less and runs without a pressure washer. Either way, the technique is the same: apply thick foam to the entire vehicle from the lower panels upward (counterintuitive, but the foam dwells longer this way), let it sit for three to five minutes, then rinse top down.
For a stand-alone pre-wash without foam equipment, a citrus pre-wash spray applied with a pump sprayer and rinsed off works almost as well. The point is to lift the worst of the dirt with chemistry before you touch the paint with a mitt.
Phase 3 — The Two-Bucket Contact Wash
Two buckets — one wash, one rinse — both with grit guards in the bottom. The wash bucket holds pH-neutral car wash soap diluted to label spec. The rinse bucket holds clean water. After each section, dunk the mitt in the rinse bucket and agitate against the grit guard to release dirt, then re-dunk in the soap bucket for the next section.
The single-bucket method is the most common technique mistake in DIY detailing. One bucket means every dirty mitt dunk re-introduces grit into the soapy water, and that grit ends up on the paint with the next swipe. The rinse bucket is the difference between adding swirl marks and removing them.
Wash with a premium microfiber wash mitt — never a sponge, never a brush, never a chamois on raw paint. Mitts have long fibers that pull grit away from the surface; sponges trap grit against the surface. Straight-line motions, top down, vehicle divided into sections (roof, hood, upper sides, lower sides, lower front and rear). Use a dedicated second mitt for the lower panels, which are dirtier than the upper. A quality wash mitt and a good selection of microfiber towels for drying are the most leveraged purchases in the entire kit — bad wash media puts swirl marks on the paint that take hours of polishing to remove.
If you are working from zero on soap, the best car wash soaps guide ranks the pH-neutral formulations that clean effectively without stripping wax or coatings. Brand wars in the detailing world are real, and the Chemical Guys vs Meguiar’s comparison goes deeper on the two most-asked-about lineups if you want to choose between them.
Phase 4 — Chemical Decontamination (Iron Remover)
The step almost no consumer guide explains properly. Iron remover is a sulfur-based chemistry that reacts specifically with iron particles embedded in your clear coat — primarily brake dust that has fallen on the paint over months of driving. The chemical bonds with the iron and dissolves it, while turning purple-red in the process so you can see exactly where contamination was sitting. The first time you watch a clean white paint job bleed deep purple after a spray of iron remover, you understand why this step matters.
Apply iron remover to a thoroughly rinsed, still-wet vehicle. Work in shade, never on a hot panel. Spray the lower panels and wheel arches heavily — that is where most fallout settles. Let it dwell two to four minutes (watch for the color change but do not let it dry), agitate lightly with a wash mitt if needed, then rinse thoroughly. The vehicle should be visually clean before this step and visually identical after it. The work iron remover does is invisible to the eye but eliminates the embedded particles that would otherwise drag across the paint during the next step.
Skip this step and the clay bar in the next phase will pull those iron particles across the clear coat as it tries to lift them, marring the paint in the process. Iron remover plus clay bar is the proper one-two for decontamination. Either one alone is incomplete.
Phase 5 — Mechanical Decontamination (Clay Bar)
Bonded contamination that iron remover cannot dissolve — tree sap, tar specks, paint overspray, mineral deposits — comes off mechanically with a clay bar. The technique is straightforward but the lubrication is critical: never drag clay across dry paint. The clay needs to glide on a film of dedicated clay lubricant or quick-detailer spray. Without lubrication, the clay grips the paint and marrs it badly.
The plastic-bag test before and after tells you everything you need to know. Put a sandwich bag over your fingertips and slide them across a clean, dried panel before clay barring. You will feel small bumps — embedded contamination you cannot see. After the clay bar pass, run the test again. The paint should feel like glass. That sensation — the bag sliding silently across a surface that was previously gritty — is the moment that justifies the whole step.
Use a medium-grade clay or a synthetic clay alternative (clay mitts and synthetic clay pads, which are reusable and faster). Spray clay lubricant generously, slide the clay in straight lines across each panel with light pressure, fold and re-kneed the clay regularly to expose a clean working surface, and stop when the panel feels smooth. Inspect the clay regularly — once it is heavily contaminated, switch to a new piece. A clay bar dropped on the ground gets discarded; the grit it picks up off concrete becomes a paint-damaging hazard immediately. Our best clay bar kits guide covers traditional clay, synthetic mitts, and combo kits at the price points that make sense for occasional users versus monthly detailers.
Phase 6 — Drying Properly
Wet paint cannot be waxed. Drying is the bridge between cleaning and protection, and how you do it matters.
A high-quality plush microfiber drying towel — the thick, twist-loop weave kind, not the thin glass-cleaning kind — absorbs water without dragging. Use a blotting motion rather than wiping motions. Two towels at minimum: one for the upper panels and one for the lower panels, kept separate to avoid moving lower-panel grit onto upper panels.
A leaf blower or a dedicated car dryer pushes water out of trim crevices, mirror housings, door handles, and license plate frames where towels cannot reach. Water hiding in these areas drips out later, often after wax has been applied, causing water spots on the freshly protected paint. Twenty seconds of blower per side eliminates this. The leaf blower trick is the difference between a dry car and a car that looks dry but has water-spot trails appearing two hours later.
Phase 7 — Polish (Only if You Need It)
If your paint shows visible swirl marks or oxidation in direct sunlight, polishing is the step that fixes it. If the paint looks acceptable, skip this step and go straight to wax. Polishing is the most skill-intensive part of the entire routine and the easiest place for a DIYer to cause real damage. A beginner with a dual-action polisher, a wool pad, and aggressive compound can burn through clear coat on a panel edge in seconds.
The honest entry-level approach is to use a dual-action polisher (forced-rotation DA polishers are more forgiving for beginners than free-spinning DAs), the least aggressive combination that will work (a finishing pad and a one-step polish), and to start on a less-visible test spot. Two passes of light polish on a hood panel, wiped down, inspected in direct sun — if the swirl marks are gone, the combination is right. If they remain, step up incrementally to a polishing pad and a medium polish. The best car polishers guide covers DA machines at the experience levels that match different ambitions, from entry-level orbital units to professional forced-rotation tools.
Polishing removes a microscopic layer of clear coat each pass. A daily driver can typically take five to ten light polishing sessions over its life before the clear coat needs to be left alone. Aggressive compound work — heavy oxidation removal — counts as several light sessions. Be conservative and the paint stays correctable for years; be aggressive and you eventually break through to color coat and need a respray.
If your car has visible swirls but you are not ready to take on polishing yourself, a quality glaze hides them temporarily under the wax layer. Glazes are a cosmetic patch rather than a fix, but they look real and cost nothing in clear coat. Heavy scratches that have cut into the clear coat need either polishing (if shallow) or proper touch-up (if deep) — the best car scratch removers guide covers what is realistic to fix DIY versus what needs to go to a body shop.
Phase 8 — Protect (Wax, Sealant, or Spray Ceramic)
Three tiers of protection, in increasing order of durability and cost. Pick the one that matches your maintenance pattern.
Carnauba wax lasts six to ten weeks on a daily driver. The look is warm and deep — the traditional “show car” finish that wins beauty contests. The downside is short durability and the weekly investment of re-application or top-ups. Best for enthusiasts who enjoy the application as part of the hobby and have a covered vehicle. Our best car wax guide ranks pure carnauba blends and traditional paste waxes.
Synthetic sealants last three to six months on a daily driver. The look is cleaner and harder than carnauba — more “showroom new” than “show car.” Application is faster (typically a spray-and-wipe). Best for daily drivers where durability matters more than the warmest possible finish. The best car paint sealants guide covers spray sealants, hybrid spray-ceramics, and traditional liquid sealants.
Consumer ceramic coatings and DIY ceramic kits last one to three years on a daily driver, sometimes more on a garaged vehicle. The look is glass-like, the protection is genuine, and the maintenance is simple maintenance washes plus a yearly topper. Application is exacting — surface prep must be perfect, application windows are tight, and a botched install creates streaks that require polishing to remove. Our ceramic coating vs wax comparison breaks down the tradeoffs honestly, and the best ceramic coatings for cars guide ranks the consumer kits worth considering.
Apply whichever you choose to a clean, dry, decontaminated, polished surface, working one panel at a time, allowing the proper haze time per the product instructions, and buffing off with clean microfiber. Use one application towel for putting product on and a separate buffing towel for taking it off. Two passes per panel are usually enough; more is not better and often creates streaking. Finish the exterior with tire dressing on the previously cleaned tires.
For vehicles facing heavy paint exposure — track cars, daily drivers in salt-belt winters, vehicles parked outdoors year-round — consider paint protection film on the highest-impact areas (hood, front bumper, mirrors) instead of or in addition to wax and ceramic. PPF is the physical-armor option for the front-third of the vehicle and outlasts every chemical protection.
Phase 9 — Engine Bay (Most Guides Skip This)
A clean engine bay is the difference between a car that looks detailed and a car that looks detailed like a pro. The work takes 25 to 30 minutes and most owners are intimidated by it without reason.
The rules are straightforward. Cold engine — never spray water on hot metal. Cover the ECU, fuse box, alternator, and any open intake with plastic bags secured with rubber bands or painter’s tape. Use a citrus or all-purpose degreaser sprayed on plastic and metal surfaces, agitate with a soft detail brush, then rinse with low pressure — a garden hose without the spray nozzle, or a pump sprayer of clean water. Avoid pressure washing the engine bay directly. Allow everything to air dry, or use a leaf blower to speed it up.
Dress the visible plastic and rubber components with a non-shiny, water-based dressing — not the same high-shine tire dressing you used on the tires. Engine bay dressing should look factory-fresh, not wet. The hoses, plastic intake manifold covers, and engine cover all come back to a clean matte finish that makes the whole engine bay look ten years younger.
Phase 10 — Interior (The Half Most Guides Get Wrong)
Interior cleaning order matters as much as exterior order. Done in the wrong sequence, you spend an hour redoing work.
Clear everything out first. Floor mats, trash, removable accessories, anything not bolted in. Pull the floor mats out and beat them or wash them separately so the loose dirt does not redistribute into the carpet you are about to vacuum.
Vacuum thoroughly second. Every surface — seats, floor, mats, cargo area, door pockets, under the seats — gets vacuumed before any wet cleaning starts. Wet cleaning over dirt turns it into mud that gets ground into upholstery and carpet. A car vacuum with strong suction and proper attachments — crevice tool, brush head, narrow upholstery tool — is the single most important interior tool you own. Our best car vacuums guide covers corded and cordless options at every price point.
Hard surfaces third. Dashboard, console, steering wheel, door cards, vents, gauge cluster — work top-down within the interior. A detailing brush set is essential for vents and seams where microfiber towels cannot reach. Use a quality interior cleaner — see the best car interior cleaners guide for what works on plastic, vinyl, leather, and dashboard surfaces without leaving a sticky residue. Avoid silicone-based dash protectants on the steering wheel and pedals — they create a slippery surface that is a safety hazard.
Seats and carpet fourth. Cloth upholstery cleaner with a soft brush, worked in small circles, blotted dry with microfiber. Leather seats get a pH-neutral leather cleaner first, allowed to dry completely, then a separate leather conditioner applied sparingly. Conditioner over uncleaned leather seals contamination into the surface. Carpet and floor mats get cloth cleaner or carpet shampoo with a brush, then either vacuum-extracted or thoroughly blotted dry. Heavily stained carpet benefits from an extractor or steam cleaner; a routine clean rarely needs either.
Odor elimination fifth. With surfaces clean, an enzymatic odor eliminator (not a fragrance spray) addresses the source of smells rather than masking them. Cabin air filter replacement is often the actual fix for persistent odors and is a 15-minute job — see the best cabin air filters guide if yours is past due.
Interior glass last. All glass surfaces — windshield, side windows, rear glass, mirrors — get cleaned with an ammonia-free glass cleaner on a flat-weave glass microfiber towel. Two-direction technique: wipe horizontally on the outside of the glass, vertically on the inside (or vice versa). When you spot a streak, you immediately know which side it is on.
Five Mistakes That Scratch Your Paint
Every detail job has the potential to add scratches if you make these mistakes. They are the most common DIY errors I see, and they are all fixable habits.
Dish soap on the wash bucket. Already covered in the FAQs above. It strips wax and protective coatings in one wash. Never use it for regular cleaning.
Circular wash motions. Concentrates grit into tight orbital marks. Use straight-line motions, front to back of the vehicle. The grit goes across a longer distance and becomes far less visible.
One bucket instead of two. Re-introduces grit into the wash water every time you dunk the mitt. Two buckets — wash and rinse — both with grit guards. Non-negotiable.
Washing in direct sun. Soap dries on the paint, leaving spots. Wax flash-dries before it can be buffed. Water spots become permanent etching. Always work in shade or in early morning before the panels heat up.
Cross-contamination between wheel media and paint media. Wheel brushes and wheel mitts hold abrasive metallic particles long after washing. Using them on paint puts those particles directly onto clear coat. Dedicated wheel-only media that never touches paint.
Maintenance Calendar
A simple cadence keeps you ahead of contamination instead of catching up to it.
| Frequency | What to Do |
|---|---|
| Weekly (winter) or biweekly (summer) | Maintenance wash — two-bucket method, no decontamination |
| Monthly | Interior quick clean — vacuum, hard surface wipe, glass |
| Quarterly | Wax or sealant touch-up between full details |
| Twice a year (spring + fall) | Full detail per this guide |
| Annually | Clay bar decontamination, headlight restoration if needed |
| As needed | Polish or compound work for swirl correction |
The spring detail is the more important of the two — it removes accumulated road salt and brake dust from winter. Skipping the spring decontamination is what causes the slow paint degradation that becomes expensive after a few years. If your headlights are clouding, the best headlight restoration kits recover 40 to 70 percent of lost output in an evening’s work and pair naturally with the annual spring detail.
Final Word from the Shop
The customer with the swirled black sedan came back six months later with a properly washed car. He had stopped using one bucket. He had stopped washing in circles. He had bought a second pair of mitts dedicated to lower panels and a third for wheels. The car was not perfect — three years of bad technique had embedded swirls that needed a polish session to fix — but it was clearly maintained by someone who understood the work, not someone going through motions. We did one polish pass on the worst panels and applied a quality sealant. He has been keeping it that way ever since.
Detailing like a pro is not about owning the most expensive equipment. It is about understanding the sequence, respecting the materials, and being honest about your time and skill. The Saturday in this guide is the difference between a car that looks like it is two years old at five and a car that looks like it is five years old at two. Block out the time, work through the order, and pay attention to the little things — straight lines, two buckets, shade, dedicated media. The result is paint that holds up, an interior that does not feel its age, and a routine that gets faster every time you do it. That is the only secret professional detailers actually have.
Buyer's Guide
Six factors decide how deep your detail needs to go and which tools are worth buying versus borrowing. Calibrate to your specific situation and the work becomes routine.
How Long Since the Last Real Detail
A car that has been washed regularly and was detailed within the last six months needs the maintenance version of this routine — a thorough wash, a quick interior cleanup, and a wax refresh. Two to three hours of work. A car that has been washed but not detailed in over a year needs the full sequence with a clay bar pass and likely a polish step before wax — five to six hours. A car that has been neglected for several years — weathered paint, embedded brake dust on the wheels, interior that has gone unattended through multiple seasons — needs a two-day approach. Day one is exterior wash, full chemical and mechanical decontamination, and either polish or aggressive single-stage compound. Day two is wax or sealant application and the full interior. Trying to compress a multi-year backlog into one Saturday produces a rushed, mediocre result that misses the satisfying transformation you were after. Be honest about which bucket you are in before you start.
Your Climate and How the Car Is Stored
Garaged vehicles in dry climates accumulate contamination slowly. The full detail two times a year guideline is comfortable. Outdoor-parked vehicles in temperate climates need quarterly detailing to stay on top of UV oxidation, pollen, and bird-dropping etching. Vehicles in salt-belt winters need an immediate post-winter decontamination detail every spring — road salt left on the paint and undercarriage causes cumulative damage that becomes expensive to reverse after a few years. Coastal vehicles dealing with sea-salt mist need the same frequent decontamination plus extra attention to chrome and exposed metal. The principle is to match detailing frequency to contamination rate. A garage-kept commuter in Arizona is at one end of the spectrum; an outdoor-parked daily driver in Minnesota or Boston is at the other end, and they need very different schedules to achieve the same paint condition.
Paint Color and Condition
Dark colors — especially black, dark blue, and dark red — show every swirl mark, every water spot, and every imperfection ruthlessly. White, silver, and light grays are the most forgiving and can look acceptable with significantly less work. The same wash technique that produces an acceptable result on a silver Camry will produce a visibly swirled finish on a black BMW. Owners of dark-colored vehicles need to be more careful about wash media (premium microfiber mitts, not sponges), wash technique (straight lines, never circles), and the two-bucket method (one wash bucket, one rinse bucket with a grit guard to keep contamination out of the wash water). Owners of light-colored vehicles can be slightly less fastidious about technique without immediate visible consequences. The other side of the same coin: light colors show iron contamination on the lower panels — the rusty fallout from brake dust — much more obviously than dark colors. Match your effort to what your specific paint actually shows.
Whether the Car Has Existing Protection
A vehicle that has a fresh ceramic coating, a recent paint protection film install, or a quality sealant in good condition needs a fundamentally different approach than bare clear coat. Coated vehicles should be washed with coating-safe pH-neutral shampoos (regular car wash soap is usually fine), should skip strong iron removers except on lower panels where wheel fallout settles, and absolutely should not be clay barred or polished without consulting whoever installed the coating. Aggressive decontamination and polishing strip ceramic coatings. The full detail on a coated vehicle is wash, decontaminate lightly only where needed, and apply a topper or maintenance spray made for the coating. Bare clear coat or older wax can take the full routine without concern. If you are unsure whether your vehicle has a coating, the water-bead test tells you — water that beads tightly and rolls off in clean rivulets indicates active protection; water that sheets and clings indicates no active protection. The decision tree starts with what is currently on the paint, not with a fixed product list.
Available Tools and Workspace
The baseline tool list for an honest DIY detail is modest — two buckets with grit guards, a quality wash mitt, microfiber drying towels, a foam cannon or foam gun with a hose connection, a wheel brush set, an iron remover, a clay bar kit, a few microfiber towels for wax application and buffing, a car vacuum, and an interior cleaner. The optional but elevated tools are a pressure washer (transforms the pre-wash phase), a dual-action polisher (required if you want to remove swirl marks rather than just hide them), and an interior steam cleaner (transforms deep upholstery cleaning). Total baseline investment from scratch is around 200 to 300 dollars; the elevated kit doubles that. Workspace requires shade or a garage, a hose with adequate water pressure, and enough room to walk around the vehicle. A driveway in the shade in cool weather works perfectly. A driveway in direct afternoon summer sun is the worst possible workspace and the source of most failed details I have seen. Match your purchase decisions to how often you will detail — for two details a year, borrow or rent the polisher. For monthly maintenance, owning it pays back fast.
When to DIY Versus Call a Professional Detailer
Most of this routine is DIY-friendly for anyone willing to invest the Saturday. The honest cases for paying a professional are real but specific. Paint correction — actually removing swirl marks rather than masking them — is a skill that takes hundreds of hours to develop, and a beginner with a dual-action polisher on dark paint can do real damage to clear coat. If your car has significant swirls and you want them gone, the 400 to 800 dollars at a pro detail shop is genuinely worth it for the result and the avoided damage risk. Ceramic coating application is shop work — surface prep requirements are precise, application windows are tight, and a botched install is a multi-thousand-dollar problem. Deep interior cleaning on heavily soiled vehicles — pet hair embedded in carpet, food spills that have set for months, smoke odor — benefits from professional steam cleaning and odor treatment that DIY equipment will not match. Heavily oxidized single-stage paint on older vehicles needs experienced wet-sanding, which is beyond most DIYers. Everything else — routine maintenance washing, decontamination, wax and sealant, interior cleaning — is a skill anyone can develop in a few sessions and save real money doing themselves over the life of the vehicle.
Frequently Asked Questions
How long does it actually take to detail a car yourself?
What's the difference between polishing and waxing — and which one do I need?
Can I really use dish soap to wash my car if I'm in a pinch?
What's the right interval for detailing a car?
Should I detail my car in direct sunlight or in the shade?
Related Articles
About the Reviewer
Mike Reeves, ASE Master Technician
A.A.S. Automotive Technology, Universal Technical Institute (UTI)
Mike Reeves is an ASE Master Technician with 15 years of hands-on experience in automotive repair and diagnostics. He earned his A.A.S. in Automotive Technology from UTI and runs his own independent shop in Denver, Colorado. Mike founded RevRated to help everyday car owners make smarter parts decisions -- every recommendation comes from real-world testing in his garage.