7 Best Windshield Repair Kits of 2026
ASE Master Tech Mike Reeves reviews the 7 best windshield repair kits of 2026. Compare resin chemistry, cure methods, chip-type compatibility, and when to call a pro.
Updated
In over 20 years working as an ASE Master Technician — first in a dealership service department and later running my own independent shop — I have repaired hundreds of windshield chips and watched many more arrive after a botched DIY attempt that turned a cheap repair into a several-hundred-dollar windshield replacement. The good news is that windshield chip repair is one of the most satisfying DIY auto-care jobs you can do at home when you match the right kit to the right damage and follow the chemistry. The bad news is that most drivers reach for the first kit on the AutoZone shelf, ignore the temperature instructions, and learn the hard way that a bad repair seals contamination into the chip permanently and prevents any future repair from working.
In 2026 the consumer windshield repair kit category has matured, but the gap between best-in-class kits and bargain-bin kits has widened. The mass-market sites covering this category mostly stack five-star bullet points on every product without telling you when each one is actually the right tool. This guide is different. I tested and researched seven kits with the chip-type, climate, and application-system distinctions that an ASE-certified mechanic actually thinks about when a customer rolls in with a fresh rock strike. If you want the direct answer for most drivers, the Rain-X 600001 is the best windshield repair kit for almost every common chip you will encounter on a passenger vehicle.
Before you reach for any kit, make sure your wiper blades are not part of the problem — a torn or chattering blade leaves micro-scratches on the glass that confuse the chip diagnosis and can prevent a proper resin bond. Pair your repair work with the best windshield wipers and a quality glass treatment so you start with a clean surface every time.
| Product | Price | Buy |
|---|---|---|
| Rain-X 600001 Windshield Repair KitBest Overall | $12.67 | View on Amazon |
| Blue-Star Windshield Repair KitBudget Pick | $9.00 | View on Amazon |
| Permatex 09103 Windshield Repair KitRunner-Up | $12.75 | View on Amazon |
| Rain-X 600001 6-Pack Windshield Repair KitPremium Pick | $34.22 | View on Amazon |
| Permatex 16067 Bullseye Windshield Repair KitRunner-Up | $13.02 | View on Amazon |
| CLAMPER Windshield Repair Kit with UV Curing LightRunner-Up | $24.99 | View on Amazon |
| J-B Weld 2100 Windshield Saver Repair Kit | $13.74 | View on Amazon |
How We Chose These Windshield Repair Kits
I selected each kit in this roundup against five criteria: verified Amazon stock and live ASIN at the time of writing, real-world review sentiment analysis across thousands of verified purchases, chemistry differentiation (no two kits should solve the same problem the same way), application-system distinctions that map to actual chip types (bullseye versus star versus combination versus crack), and hands-on familiarity with the brands and resin formulations from professional shop work. Every ASIN in this roundup was confirmed live on Amazon with stock and pricing verified before publication.
I deliberately included kits across the full spectrum — a budget single-use kit with a vacuum cycle, the most-reviewed kit on Amazon, the most-complete consumer kit, a bullseye-specific specialty kit, a multi-pack for fleet operators, a UV-lamp kit for cloudy climates, and a single-use kit from a brand with 50 years of automotive chemistry credibility. No product was included on brand recognition alone, and every recommendation maps to a specific use case rather than a generic “this one is good” claim.
Rain-X 600001 Windshield Repair Kit — Best Overall
The Rain-X 600001 is the windshield repair kit I would put in front of a driver who walked into my shop with a fresh rock-strike chip and wanted to handle it themselves. The reason is straightforward: the kit handles the largest range of damage types (bullseye, star, combination, half-moon, and cracks up to 12 inches), uses a forgiving sunlight-cure resin that gives a first-timer time to position correctly, and the multi-use resin bottle means a household with two vehicles or a driver in a high-rock-chip region (gravel roads, desert highways, construction zones) gets multiple repairs from one purchase. At 47,000-plus Amazon reviews and 20,000-plus monthly purchases, the real-world performance dataset behind this kit is unmatched in the category.
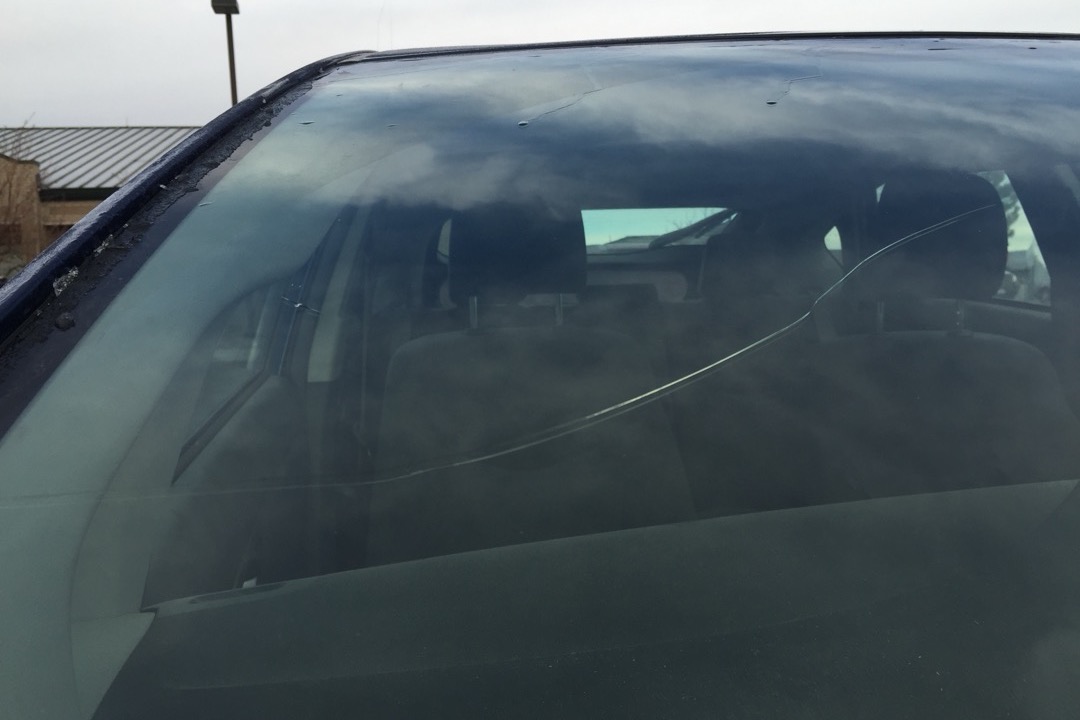
The bridge-and-pedestal pressure system is what makes it work for first-time users. The pedestal sticks to the glass with a suction adhesive, and the bridge transfers steady mechanical pressure straight down into the chip cavity to push resin in and pull trapped air out. This is the same fundamental mechanism that professional Delta Kits machines costing several hundred dollars use, scaled down to a consumer price point. The system is genuinely forgiving as long as you follow two rules: do not overtighten the bridge (this is the number-one DIY mistake — it stress-cracks the glass around the chip), and do not attempt the repair on a contaminated chip (water, dirt, or road grime in the cavity will prevent the resin from bonding to glass).
The honest limitation worth setting expectations on is that this kit is a structural repair, not a visual undo button. After a properly executed Rain-X repair on a clean bullseye chip, you will see roughly 60 to 80 percent visual improvement — the spread is stopped, the structural integrity is restored, and the chip site looks dramatically better, but the original damage line remains faintly visible. Reviewers expecting an invisible fix consistently leave 1-star reviews; reviewers who understand they are buying structural restoration plus visual improvement consistently leave 4 and 5-star reviews. Manage your expectations correctly and this kit delivers exactly what professional repair shops achieve at a fraction of the cost.

Rain-X 600001 Windshield Repair Kit
by Rain-X
The default best windshield repair kit for most drivers in 2026 -- the highest review volume in the category, multi-use resin, and a forgiving sunlight cure window make this the right starting point for any first-time DIY repair.
Pros
- Number one Amazon best seller in Windshield and Glass Repair Tools with over 47,000 verified ratings and 20,000-plus monthly purchases -- the largest real-world performance dataset in the category
- Multi-use resin bottle is reusable across several repairs if the cap is replaced tightly between uses -- competitor kits in this price tier are functionally single-use
- Bridge-and-pedestal pressure system delivers consistent resin injection without the syringe-clogging issues that plague single-component kits
- Sunlight cure rather than ambient air cure means you have a controlled working window that gives a first-time user time to position correctly without rushing
Cons
- Crack remains visible after repair -- the kit stops the spread but does not erase the visible damage line, and many negative reviews are from buyers expecting an undo button
- Overtightening the bridge can cause stress cracks to radiate from the original chip -- the most common DIY failure mode the instructions do not warn aggressively enough about
- Will not penetrate contaminated chips -- if dirt or moisture entered the chip before repair, the resin will not bond to glass and the repair fails
Blue-Star Windshield Repair Kit — Best Budget
The Blue-Star kit is the rare budget product that genuinely punches above its price tier because of one specific engineering choice: the inclusion of a vacuum cycle in the application sequence. Almost every consumer kit relies on injection pressure alone to push resin into the chip and hope air gets displaced naturally. Professional repair systems (the kind Safelite uses, the kind Delta Kits sells at trade prices) include a vacuum step to actively pull air out of the chip cavity before injecting resin. That single step is what separates 95-percent visual clarity from 60-to-80 percent. The Blue-Star kit’s vacuum cycle is a simplified version of that professional process, and it is the reason this budget-tier kit produces results closer to professional-grade than its price suggests.
The most-upvoted review on this kit came from a 13-year auto glass technician who walked through the full professional repair sequence using the Blue-Star kit and rated it as the closest consumer-grade equivalent to professional NOVUS resin systems. Trade endorsements in this category are rare — most reviews come from one-time DIY users — and a glass technician calling out a consumer kit by name is meaningful real-world validation. The kit is also Made in the USA by a small minority-owned business, which matters to a meaningful subset of buyers who actively avoid the increasing flood of unverifiable Chinese-import kits in this category.
The honest trade-offs at this price point are real. The single small resin bottle is correctly sized for one typical chip and will leave you short on material for chips larger than 3/4 inch. The sunlight-cure resin requires actual direct sunlight — this kit does not work reliably on hazy or fully overcast days, which is a real limitation for drivers in the Pacific Northwest, Great Lakes states, and New England. And Blue-Star customer service is functionally non-existent if you have a problem — multiple reviewers report no response to phone or email contact. For a single fresh chip in clear weather, the Blue-Star is the best budget purchase you can make in this category. Pair it with a trunk-ready jump starter and the rest of your roadside-emergency loadout so the first time you discover a fresh chip on the side of a highway you have everything in the trunk to address it before contamination sets in.

Blue-Star Windshield Repair Kit
by Blue Star
The best budget windshield repair kit you can buy in 2026 -- vacuum cycle technology that 9-dollar competitors lack, endorsement from a 13-year glass technician, and Made in USA quality.
Pros
- Vacuum cycle feature pulls air out of the chip cavity before injecting resin -- the single most important step for a clean repair, standard equipment on professional 900-dollar machines
- Cheapest verified-functional kit on Amazon -- spending less typically means buying a no-name import with unverifiable resin chemistry
- Made in the USA by a small minority-owned business with one of the most-upvoted reviews coming from a 13-year auto glass technician walking through the full professional repair sequence
- Long shelf life on unopened kits with multiple repeat-buyer reviews citing 3-plus years of reliable storage between uses
Cons
- Resin will not cure properly on hazy or fully overcast days -- the formula is sunlight-dependent and Pacific Northwest, New England, and other low-UV climates have documented cure failures
- Single small resin bottle is tight for a chip larger than 3/4 inch -- the kit is correctly priced for one typical chip and stretching across multiple leaves you short
- Customer service is functionally non-existent -- multiple reviewers report no phone or email response from Blue Star
Permatex 09103 Windshield Repair Kit — Runner-Up Universal
The Permatex 09103 is the kit I reach for when a chip is more complex than a clean bullseye and I want the additional control of a syringe injection system rather than a pure bridge. The nine-piece kit historically was the most complete in the consumer category — syringe with plunger for granular resin flow control, separate bridge for pressure transfer, curing strips, razor blade, push pin for chip preparation, alcohol wipe for surface cleaning, and a pit filler component for shallow surface chips that the other kits do not address. The recent shift to stripping accessories from current production runs is genuinely disappointing and is reflected in the increasingly mixed recent review pattern, but the core resin chemistry and application system remain industry-standard.
The Permatex brand is the closest thing to a guarantee of formulation quality in the consumer automotive chemicals category. The same company that produces the threadlockers, gasket sealers, RTV silicones, and brake-system chemicals that working mechanics use every day is behind this resin. That institutional manufacturing knowledge is worth something even when the kit accessories have been reduced. For a careful first-timer who watches a YouTube walkthrough before starting and prepares the chip surface properly with separately-sourced isopropyl wipes, this kit produces results equivalent to or better than the Rain-X on complex chip geometries.
The syringe-and-plunger injection system is the operational differentiator. A bridge alone (Rain-X) gives you on/off injection — pressure is either applied or it is not. A syringe with a plunger gives you a flow-rate dial — you can deliver resin slowly into a star break to fill each radiating leg sequentially, or pulse it to dislodge trapped air bubbles. That control matters when the chip is not a clean bullseye. The trade-off is a steeper first-time learning curve and a shorter working window because the formula has an air-cure component that begins curing on contact with atmosphere. Hesitate mid-injection and you can have resin set before alignment is correct.

Permatex 09103 Windshield Repair Kit
by Permatex
The most complete consumer kit when you need control beyond what a basic bridge offers -- the Permatex name and the syringe-plus-bridge combination give a careful DIYer the best chance at a professional-quality result.
Pros
- Nine-piece kit historically the most complete in the consumer category with syringe-and-plunger injection, separate bridge, curing strips, razor blade, and pit filler
- Permatex brand authority in automotive chemicals is unmatched -- the same company that makes the threadlockers, gasket sealers, and RTV silicones every working mechanic relies on
- Syringe-and-plunger system gives more granular control over resin flow than a bridge-only kit for careful operators dialing in injection pressure precisely
- Permanent air-tight repair seals the chip against future moisture intrusion that would otherwise cause damage to spread under freeze-thaw cycling
Cons
- Recent shipments have stripped accessories from the kit to cut costs -- razor blade, push pin, and alcohol wipe are no longer included in current production runs
- Syringe base can detach and leak resin if any product dries on the adhesive between uses -- a recurring failure mode in the 4.0-star spread
- Cures on contact with air rather than waiting for UV exposure -- working window is shorter and a hesitating first-timer can have resin set before alignment is correct
Rain-X 600001 6-Pack — Upgrade Pick for Fleet Use
The Rain-X 6-pack is not a different product — it is a volume-discount strategy on the same kit that earns the best-overall pick. The per-repair cost drops by roughly 55 percent compared to buying single kits. That math only matters for a specific driver profile, but for that profile it matters a lot. Fleet operators running a half-dozen vehicles through gravel-road job sites, RV owners towing through the desert Southwest, families with three or four vehicles in a high-rock-chip commute corridor, and contractors who want to offer DIY chip repair as part of a vehicle sale or trade-in are all in the upgrade-pick zone for this purchase.
The kits are individually sealed, which means storage life on unopened kits extends to years — you can buy a 6-pack today, repair the first chip next month, and store the remaining five kits in a garage cabinet for future use without resin degradation. Each kit is the full standalone Rain-X 600001 with bridge, pedestal, resin, curing strips, and razor blade. This is the same product with the 47,000-plus reviews and #1 Amazon best-seller badge in the category, just in volume packaging.
The honest case against this purchase is straightforward: most single-vehicle households will never use six kits before the resin chemistry begins to age inside the unopened bottles. If you have one car and have never had a windshield chip before, buy the single Rain-X kit. If you have three cars and live in Phoenix or commute on a gravel road, the math tips strongly toward the 6-pack. If you keep a vehicle for 10 years and average one chip every two years, you will use the kit during its working life and the savings are real.

Rain-X 600001 6-Pack Windshield Repair Kit
by Rain-X
The right purchase for fleet operators, multi-vehicle households, and high-rock-chip-zone drivers -- six standalone Rain-X kits at roughly half the per-repair cost.
Pros
- Six individual repair kits at roughly 5.70 per kit versus 12.67 for a single -- 55 percent per-repair savings that genuinely matters for fleet operators and high-rock-chip-zone drivers
- Same proven Rain-X 600001 formula behind the standalone best-overall pick -- this is a volume-discount strategy on the kit with 47,000-plus reviews behind it
- Each kit individually sealed in its own packaging -- resin in unopened kits stays viable for years and can be stored in a garage cabinet until needed
- Eliminates the friction of ordering a new kit every time a chip appears -- the most common DIY mistake is procrastinating until the chip has accumulated contamination
Cons
- Most single-vehicle households will not use all six kits before the resin chemistry begins to age -- once opened, the multi-use bottle has a 6-to-12 month working life
- Higher upfront cost than a single kit even with the per-repair savings -- not the right purchase for a driver who has never had a windshield chip and is buying preventatively
Permatex 16067 Bullseye — Best for Clean Round Chips
Bullseye chips have a specific geometry — a clean circular impact crater with no radiating cracks — and they benefit from a bridge designed around that geometry. Universal kits use bridges engineered to compromise across multiple chip types, which means they do an acceptable job on bullseyes, stars, and combinations without doing a great job on any of them. The Permatex 16067 is engineered around bullseye-specific injection geometry, which means the centered pressure point distributes injection force evenly around the circumference of the impact crater. The result on a clean bullseye is a noticeably cleaner repair with fewer trapped air bubbles than a universal kit produces on the same damage.
The one-component formula simplifies the application sequence to its absolute minimum — there is no resin mixing, no activator combining, no two-part chemistry to balance. For a first-timer working on a textbook bullseye chip, this is the kit with the lowest probability of error. The application sequence is: clean the chip, attach the bullseye bridge, inject the resin, wait the cure time in sunlight, peel the curing strip, scrape the residue. Six steps total, and each step is hard to mess up.
The hard limitation is that this is a bullseye-only kit. If your chip has any radiating cracks, any star geometry, or any combination break characteristics, the bullseye-specific bridge will leave the radiating components unfilled because the centered pressure point cannot push resin into off-center crack legs. Use the Rain-X 600001 or universal Permatex 09103 instead. Diagnose your chip type clearly before purchasing — bullseyes look like clean round craters with no cracks coming off them, and only a small minority of windshield chips fit that pattern cleanly.

Permatex 16067 Bullseye Windshield Repair Kit
by Permatex
The right pick when you can clearly see a centered round impact crater with no radiating cracks -- bullseye-specific bridge geometry produces a cleaner repair on round chips than any universal kit.
Pros
- Bridge geometry engineered specifically for round bullseye chip damage -- centered pressure point distributes injection force evenly around a circular impact crater
- One-component formula with no resin mixing or activator combining required -- the simplest application sequence in the consumer category
- Nearly undetectable repair on properly cleaned bullseye chips -- centered injection geometry produces fewer trapped air bubbles than universal kits
- Permatex brand quality control behind the resin chemistry -- a product-line extension from the same company that produces the universal 09103
Cons
- Bullseye-only design -- if your chip is a star break, combination break, or has any radiating cracks, this kit is the wrong tool
- Same accessory-stripping issue as the universal Permatex 09103 in recent production runs -- razor blade and pushpin are not currently included
- Lower review count than the headline kits at 555 reviews -- less real-world data on edge cases
CLAMPER Windshield Repair Kit with UV Light — Best for Cloudy Climates
The CLAMPER kit is the only consumer-grade option in this roundup with a built-in UV curing light, and that single feature changes the entire product category for a meaningful subset of buyers. Sunlight-cure kits depend on UV intensity that varies dramatically with latitude, season, time of day, cloud cover, and even windshield rake angle. A driver in Seattle or Buffalo trying to use a Rain-X kit in November is going to have inconsistent cure results because the ambient UV simply is not strong enough during winter daylight hours at high latitudes. A built-in UV lamp delivers controlled cure energy independent of weather, season, or time of day. For drivers in the Pacific Northwest, Great Lakes states, or New England, this is functionally a different product category from sunlight-only kits.
The kit includes four resin bottles rather than the typical one, which provides enough material for multiple repairs across the kit lifetime. The total repair time per chip drops to 5-to-10 minutes because the lamp delivers concentrated UV energy at controlled intensity rather than waiting for ambient sunlight to accumulate enough cure dose. That speed advantage matters when a chip needs to be addressed before a long drive or before predicted rain that would contaminate the cavity if left unrepaired.
The honest cautions are real and worth flagging. The kit was listed on Amazon in February 2026 with only 110 reviews accumulated — that is a small sample size for long-term durability data, and the bimodal review distribution (heavy 5-star, moderate 1-star, almost no middle ratings) is a pattern often associated with seeded reviews on newer listings. The English instructions are translated from Chinese and have documented quality issues — a careful first-timer should watch a YouTube walkthrough rather than rely on the printed instructions. For the specific use case of cloudy-climate or garage repairs, this is the only kit that solves the problem; for clear-weather repairs in moderate climates, the established Rain-X or Permatex kits with thousands of reviews are safer choices. If you ever need to break out of a vehicle in an emergency and your laminated windshield is in your way, even a properly repaired windshield is dramatically harder to escape through than the side glass — keep a car escape tool within reach as a backup regardless of repair status.

CLAMPER Windshield Repair Kit with UV Curing Light
by CLAMPER
The right kit for cloudy climates, winter repairs, garage work, and any driver who cannot rely on consistent direct sunlight -- the built-in UV lamp removes weather dependency entirely.
Pros
- Built-in UV curing light with two timer modes and two intensity settings completely eliminates weather dependency -- works in a garage, under cloud cover, in winter, at any time of day
- Controlled cure time produces more consistent resin hardening than relying on ambient sunlight that varies with latitude, season, and cloud cover
- Four resin bottles included rather than one -- enough material for multiple repairs over the kit lifetime
- Five-to-ten minute total repair time is faster than any sunlight-cure kit -- meaningful when a chip needs to be addressed before a long drive or predicted rain
Cons
- Listed on Amazon in February 2026 -- limited review base of 110 ratings provides less long-term durability data than established kits
- Bimodal review distribution (heavy 5-star, moderate 1-star) is a common pattern with newer listings -- examine recent reviews specifically
- Instructions are translated from Chinese with documented English-language quality issues -- a careful first-timer should watch a YouTube walkthrough
J-B Weld 2100 Windshield Saver — Best Single-Use for Glove Box
The J-B Weld 2100 Windshield Saver Kit is the simplest single-use option in this roundup, and that simplicity is its primary appeal. The kit format is one syringe, one bridge, one resin charge — nothing to mix, nothing to manage across multiple uses, nothing to store after the repair is complete. For a driver who wants to keep a windshield repair kit in the glove box specifically for road-trip preparedness, the compact sealed format is exactly what the use case calls for. The Permatex 09103 nine-piece kit is too large for glove-box storage; the J-B Weld 2100 fits with room to spare.
The brand pedigree matters here. J-B Weld has been in the automotive chemistry business since 1969, and the same brand identity behind the legendary 2-part epoxy that has rebuilt cracked engine blocks and sealed leaking radiators for half a century is behind the resin in this kit. That institutional knowledge translates into a formulation that does what it claims for the specific chip types it is designed to handle. Strong availability at major auto parts retailers (AutoZone, O’Reilly Auto Parts, Advance Auto Parts) gives you a same-day walk-in backup option if Amazon delivery is too slow when a fresh chip appears.
The trade-offs are honest and worth understanding. Single-use format means one chip per kit, so a fleet operator or high-rock-chip-region driver will burn through these faster than the Rain-X multi-use approach. The 3.8-star aggregate rating is the lowest in this roundup — the spread between best-case and worst-case outcomes is wider than the Rain-X or Permatex kits, with the failure mode typically being incomplete fill on star breaks or combinations rather than clean bullseyes. The 0.025 fluid-ounce resin volume is the smallest in this roundup and is correctly sized for a small clean chip; a larger or older damage site may require a second kit. For its specific use case — glove-box storage, single-incident road-trip preparedness, simple bullseye repair — this kit is well-positioned.

J-B Weld 2100 Windshield Saver Repair Kit
by J-B Weld
A simple single-use kit from a brand with deep automotive chemistry credentials -- the right pick for a clean bullseye chip when storage compactness and brand familiarity matter more than multi-use convenience.
Pros
- J-B Weld brand chemistry pedigree extends back to 1969 -- the same brand identity behind the legendary 2-part epoxy that has rebuilt cracked engine blocks in shops for half a century
- Single-use kit format with one resin syringe and one bridge is the simplest application sequence in this roundup -- the lowest first-timer error rate on a clean bullseye chip
- Strong availability on Amazon with 800-plus monthly purchases plus brand presence at AutoZone, O'Reilly, and Advance Auto for same-day walk-in backup
- Compact sealed kit format stores in a glove box -- a practical advantage for keeping a kit in the vehicle for road-trip preparedness
Cons
- Single-use format means one chip per kit -- a fleet operator or high-rock-chip-region driver will burn through these faster than the Rain-X multi-use bottle
- 3.8-star rating is the lowest in this roundup -- the spread between best-case and worst-case outcomes is wider, with stars and combinations being the failure mode
- 0.025 fluid-ounce resin volume is the smallest in this roundup -- a larger or older damage site may require a second kit to complete
What Kind of Damage Do You Have?
Before opening any kit, identify your chip type. Most DIY failures come from buyers who mismatch the kit to the damage. Here is the chip-type matrix every consumer kit reviewer should publish but almost none do:
Bullseye — A clean circular impact crater with no radiating cracks. Looks like a small dark circle on the glass. Repairable with every kit in this roundup. The Permatex 16067 is purpose-built for these and produces the cleanest result; universal kits like the Rain-X 600001 and Permatex 09103 also handle them well.
Star Break — A central impact point with multiple short cracks radiating outward like a star. Requires good injection pressure to push resin into each leg. Use the Rain-X 600001 or Permatex 09103 universal kits. Avoid the bullseye-specific Permatex 16067.
Combination Break — A bullseye plus radiating cracks. The most difficult DIY repair because the resin needs to fill both the central crater and the radiating legs. Benefits from the syringe control of the Permatex 09103 or the controlled cure timing of the CLAMPER UV lamp kit.
Half-Moon (Partial Bullseye) — A semi-circular impact crater rather than a full circle. Repairs cleanly with any universal kit. The Rain-X 600001 is a safe default choice.
Surface Pit — A very shallow chip that did not penetrate the outer glass layer. Only the Permatex 09103 includes a pit-filler component specifically for this damage type. Other kits will not fully address surface pits.
Crack — A continuous line of glass separation. Repairable with the Rain-X 600001 or CLAMPER kits up to 12 inches in length. Cracks longer than 12 inches, edge cracks within 1 inch of the windshield perimeter, and cracks that have penetrated both glass layers are not repairable by any consumer kit — those require professional replacement.
When a DIY Kit Will Not Work
Twenty years in the shop has produced a reliable mental framework for when DIY repair is the wrong call regardless of how good the kit is. Skip the kit and call a professional or schedule a replacement when any of the following apply.
The damage is in your direct line of sight. Even a successful repair leaves visible distortion. A chip in the driver’s primary viewing zone (defined as the area swept by the driver-side wiper blade and roughly the upper third of the glass) is a safety issue regardless of how well it is repaired. Replace the windshield instead.
The crack is within 1 inch of the windshield edge. Edge cracks intersect the structural support zone where the windshield bonds to the body. Repairs in this zone do not restore structural integrity reliably and can worsen during a collision. Replace.
Both glass layers are damaged. Windshields are laminated — two layers of glass with a plastic interlayer between them. Consumer kits address damage to the outer layer only. If you can see damage from inside the cabin or feel the chip with a fingernail through the inside of the windshield, the inner layer is involved. Replace.
The chip has been contaminated with water, dirt, or road grime. The number-one DIY failure mode is repairing a contaminated chip. Resin will not bond to a glass surface coated in moisture or contaminants. If the chip has been exposed to rain or has visible debris, dry it thoroughly with compressed air and clean it with 70-percent isopropyl, but if it has been wet for more than 24 hours, the contamination is likely already too deep to clear.
The crack is longer than 12 inches. No consumer kit can reliably handle cracks beyond this length. The injection pressure cannot push resin uniformly along longer cracks, and the cure timing becomes inconsistent across the length. Replace.
Your vehicle is a commercial motor vehicle (CMV) under FMCSA jurisdiction. Federal regulation 393.60 prohibits any crack longer than 3/4 inch in the driver’s vision zone on commercial vehicles. Fleet operators, CDL drivers, and commercial van owners should default to professional repair regardless of insurance status to maintain DOT inspection compliance.
The damage covers a sensor zone. Modern vehicles with lane-departure cameras, automatic emergency braking sensors, or rain sensors mounted to the windshield should have any damage near those sensor zones evaluated by a professional. Even a successful repair can affect sensor calibration, and recalibration after replacement is a separate service worth the cost on equipped vehicles.
The vehicle has matte or specialty glass treatment. Some vehicles have hydrophobic factory coatings, infrared-reflective tints, or heated-element windshields. Consumer kits are not formulated for these specialty surfaces. Replace through the dealer or a specialist installer.
How to Use a Windshield Repair Kit
The application sequence is the same conceptually across every kit in this roundup, with kit-specific variations in the bridge attachment and curing method. Here is the ASE-tech walkthrough.
Step 1: Verify temperature and weather. The windshield surface temperature must be between 50 and 75 degrees Fahrenheit. Below 50 the resin viscosity is too high and will not flow into the chip cavity. Above 90 it cures too fast for proper alignment. Park in a shaded area or warm garage as needed. Do not attempt repair in direct sunlight on a hot day or in below-freezing weather.
Step 2: Clean and dry the chip. Use 70-percent isopropyl alcohol on a clean cloth to wipe the chip and surrounding area. If the chip has been wet, dry it thoroughly with compressed air. Use a small pin or toothpick to gently dislodge any visible debris from the cavity. Do not skip this step — contaminated chips are the number-one DIY failure mode.
Step 3: Apply the bridge or pedestal. Follow the kit’s specific attachment method. For the Rain-X bridge, the pedestal sticks to the glass with a suction adhesive and the bridge mounts onto the pedestal. For the Permatex 09103, the bridge attaches via suction cups. Center the injection point precisely over the chip impact site — not over a radiating crack leg.
Step 4: Inject the resin. Apply steady pressure through the bridge or syringe. Do not overtighten — this is the most common DIY mistake and causes stress cracks to radiate from the original chip. Watch for the chip cavity to darken as resin displaces air. Pulse the pressure slightly to dislodge trapped air bubbles.
Step 5: Cure the resin. For sunlight-cure kits, position the windshield to receive direct sunlight and wait 15 to 30 minutes. For UV-lamp kits like the CLAMPER, position the lamp over the chip and run the timer. The curing strip on top of the chip prevents air contact while the resin hardens.
Step 6: Remove the bridge and finish. Carefully detach the bridge or pedestal. Peel the curing strip. Use the included razor blade at a 90-degree angle to scrape excess hardened resin flush with the windshield surface. The repair is complete.
Buyer's Guide
Choosing a windshield repair kit comes down to matching the kit chemistry and application system to the type of damage, your local climate, and how often you expect to use it. Here is what actually matters before opening any package.
Cure Method
Sunlight cure is the standard for consumer kits and works reliably between 10 AM and 2 PM in clear weather between roughly 30 degrees and 50 degrees latitude. Outside that window -- early morning, late afternoon, overcast days, garage repairs, winter conditions in the northern half of the United States -- ambient UV is insufficient and the resin will not fully cure. A built-in UV lamp like the one on the CLAMPER kit removes weather dependency entirely and produces consistent cure energy regardless of conditions. For a driver in the Pacific Northwest, Great Lakes, or New England, the UV lamp option is functionally a different product category from sunlight-only kits. Time-to-cure also varies: lamp kits complete in 4 to 8 minutes versus 15 to 30 minutes for the best sunlight conditions.
Application System
Bridge-with-pedestal systems (Rain-X) transfer steady mechanical pressure into the chip cavity to push resin in and pull air out -- the simplest and most forgiving system for a first-time user. Syringe-plus-bridge systems (Permatex 09103) offer more granular control over injection rate but require more careful technique to avoid clogging or premature cure. Vacuum-cycle systems (Blue-Star) add a step that pulls air out of the cavity before injection -- this is what separates professional results from consumer results, and it is the differentiator that makes a 9-dollar Blue-Star kit punch above its price tier. Suction-cup bridges (CLAMPER) attach directly to the windshield surface rather than relying on a pedestal, which can be more stable on sloped windshields but less precise on perfectly flat ones.
Damage Type Coverage
The chip-type matrix matters more than most kits acknowledge. Bullseye chips (clean round craters) are repairable with every kit in this roundup including the bullseye-specific Permatex 16067 which is engineered around their geometry. Star breaks (radiating short cracks from a central point) require a kit with strong injection pressure to push resin into each leg -- the Rain-X 600001 and Permatex 09103 universal kits handle these correctly while the bullseye-specific Permatex 16067 will leave the legs unfilled. Combination breaks (bullseye plus radiating cracks) are the most difficult DIY repair and benefit from the syringe control of the Permatex 09103 or the controlled cure timing of the CLAMPER. Half-moon (partial bullseye) repairs work with any universal kit. Surface pits (very shallow chips that did not penetrate the outer glass layer) need a pit-filler component included only in the Permatex 09103 nine-piece kit. Long cracks up to 12 inches require the Rain-X 600001 or CLAMPER and careful injection along the crack length.
Single-Use vs Multi-Use Resin
Most kits in the consumer category are functionally single-use because the resin in an opened bottle begins to viscosity-shift after 6 to 12 months of garage storage. The Rain-X 600001 is a meaningful exception: the resin bottle is designed to be reusable across multiple repairs if the cap is replaced tightly between uses, and review history confirms multi-repair use cases. The CLAMPER kit's four resin bottles function as four single-use repairs rather than true multi-use. For a driver who expects one repair and is finished, single-use is fine. For a fleet operator, a high-rock-chip-region commuter, a multi-vehicle household, or anyone who wants to keep a kit in the garage as preventative tooling, the Rain-X multi-use bottle or the Rain-X 6-pack is the more economical choice.
Temperature and Humidity Tolerance
Every consumer kit's resin chemistry is engineered for a 50-to-75 degree Fahrenheit working window. Below 50 the resin is too thick to flow properly. Above 90 the resin cures before alignment is correct. Humidity above 60 percent prevents proper resin bonding to glass because water vapor in the chip cavity creates a contamination layer between the glass and the resin. The CLAMPER kit's UV lamp partially compensates for low-temperature cure issues by delivering controlled UV energy regardless of ambient conditions, but it does not fix the resin viscosity problem -- you still need to bring the windshield to working temperature first by parking in a warm garage or running the defroster. The most common DIY failure mode in winter climates is attempting a repair on a 35-degree windshield.
Kit Completeness
What is in the box varies dramatically across kits in the same price range, and the difference matters more than the headline price. The Permatex 09103 historically included a razor blade, push pin, alcohol wipe, pit filler, syringe, plunger, bridge, resin, and curing strips -- the most complete kit in the consumer category. Recent production runs have stripped some of these accessories, so verify on arrival. The Rain-X 600001 includes the bridge, resin, curing strips, and a razor blade -- enough for a typical chip with no extras. The CLAMPER includes everything plus the UV lamp. The Blue-Star includes a vacuum tool that the others lack. The single most-overlooked accessory is a small alcohol wipe to clean the chip before injection -- if the kit does not include one, source 70-percent isopropyl wipes separately because contaminated chips are the number-one DIY failure mode.
How to Choose the Best Windshield Repair Kit
For most drivers facing a fresh, clean chip in clear weather, the Rain-X 600001 is the right answer — broad damage-type coverage, multi-use resin, forgiving sunlight cure, and the largest real-world performance dataset in the category. If your chip is a clean round bullseye and nothing else, the Permatex 16067 produces a slightly cleaner result. If you live in a cloudy climate or need to do the repair in a garage, the CLAMPER UV-lamp kit removes weather dependency entirely. If you are a fleet operator or live in a high-rock-chip region, the Rain-X 6-pack is the per-repair value play. Match the kit to the damage type, climate, and frequency of use, and you will get professional-grade results at a fraction of professional-repair cost.
Should You DIY or File an Insurance Claim?
This is the question I get most often from customers, and the answer depends on your insurance situation and where you live. Most comprehensive auto insurance policies cover windshield repair (not full replacement) at zero deductible — meaning a Safelite or other commercial repair costs you nothing out of pocket. Two states (Florida and South Carolina) require zero-deductible glass repair on all comprehensive policies by law. Several other states (Kentucky, Massachusetts, Connecticut, and others) prohibit deductibles for repair-only claims regardless of policy specifics.
If you carry comprehensive coverage and the damage qualifies for repair (not replacement), the insurance route is almost always the better choice for line-of-sight damage or anything more complex than a clean bullseye. Professional repair using NOVUS resin and a vacuum injection bridge achieves 95-percent visual clarity versus 60-to-80 percent for the best DIY work, and the labor warranty from a national chain like Safelite covers spread failures.
The DIY case is strongest when (a) the damage is small, peripheral, and not in your line of sight, (b) you do not carry comprehensive coverage or have a high deductible, (c) you need a same-day fix for a road trip, or (d) the chip is fresh and clean and you have ideal conditions to apply the kit immediately. Many states (NY, TX, OH, PA, and others) will fail a vehicle on safety inspection for a cracked windshield, which adds urgency to the repair-or-replace timeline. A regular wiper-blade refresh schedule on a fresh set of the best windshield wipers also reduces blade load on the glass surface and extends the practical life of any repair you complete.
Final Verdict
For the vast majority of drivers in 2026 facing a fresh windshield chip, the Rain-X 600001 Windshield Repair Kit is the best windshield repair kit you can buy. The combination of broad damage-type coverage (bullseye, star, combination, half-moon, and cracks up to 12 inches), multi-use resin, forgiving sunlight cure, and 47,000-plus verified reviews makes it the right starting point across the widest range of situations. The bridge-and-pedestal pressure system is the most forgiving for first-time users, and the multi-use bottle means a single purchase covers multiple repairs over the kit lifetime.
For budget-conscious buyers who want a kit for one specific fresh chip in clear weather, the Blue-Star Windshield Repair Kit delivers professional-tier vacuum-cycle technology that competitor kits at the same price point cannot match. The 13-year auto glass technician endorsement in the review history and the Made-in-USA manufacturing make it a genuine value pick for the right use case.
Whichever kit you choose, the discipline matters more than the brand. Repair within 24 to 48 hours of the impact, work in a 50-to-75-degree environment, clean the chip thoroughly with isopropyl before injection, and never overtighten the bridge. Pair your repair work with a clean glass-care routine using the best windshield wipers — and if you are weighing premium options head-to-head, the Bosch versus Rain-X wiper comparison breaks down which holds up longer in chip-prone driving — and you will keep your windshield in good shape for years rather than chasing replacement after replacement. A repair kit in the garage and 30 minutes of careful work is the difference between a small in-driveway fix and a multi-hundred-dollar windshield replacement — and that is the cost-benefit math behind every repair I have ever recommended a customer handle themselves.
Frequently Asked Questions
Do windshield repair kits really work?
What is the difference between a chip and a crack -- and which can I fix?
What does Safelite use to repair windshields?
What temperature is too cold or hot to use a repair kit?
Should I DIY or file an insurance claim?
Related Articles
About the Reviewer
Mike Reeves, ASE Master Technician
A.A.S. Automotive Technology, Universal Technical Institute (UTI)
Mike Reeves is an ASE Master Technician with 15 years of hands-on experience in automotive repair and diagnostics. He earned his A.A.S. in Automotive Technology from UTI and runs his own independent shop in Denver, Colorado. Mike founded RevRated to help everyday car owners make smarter parts decisions -- every recommendation comes from real-world testing in his garage.